Quantcast
Channel: Korena in the Kitchen
Viewing all 71 articles
Browse latest View live

Sourdough Brioche Babka with Toblerone and Caramelized White Chocolate

0
0

Sourdough Babka with Caramelized White ChocolateSometimes I swear that Jenni and Shelley, the ladies behind Sourdough Surprises, are inside my head, reading my thoughts. I was just contemplating baking all my leftover Christmas chocolate into brioche buns when they announced that January’s Sourdough Surprises recipe was going to be just that: sourdough brioche swirled with chocolate and topped with struesel, also known as babka.

There were no recipes specifically for a sourdough version, so I used a sourdough brioche recipe from Sourdough Companion with Smitten Kitchen’s non-sourdough babka recipe as a guide. For the first time, my usually-mild mannered sourdough starter really showed its personality and the resulting brioche had a pronounced sourdough tang to it. I’m not totally sure how I feel about a strong sourdough flavour in such a sweet application – it might be why there are so few sourdough brioche recipes out there – but aside from that it did make a pretty wonderful brioche: rich and buttery with a light, pull-apart, lacy texture.

To achieve that texture, you need to develop the gluten fairly well through lots of kneading, which can be kind of challenging with such a soft, wet dough. I used a “slap and fold” kneading technique which basically consists of scooping up the dough, whacking it down on the counter, and stretching and folding it over on itself, over and over again. Amazingly, it transforms a sticky mess into a smooth, cohesive, and elastic dough. Watch a video of the technique here and then try it yourself – it’s pretty satisfying. ;)

I filled one babka loaf with a chopped up Toblerone bar and the second with caramelized white chocolate, made out of all the leftover white chocolate from those ill-fated chocolate curls. Caramelized white chocolate, if you’ve never heard of it, is pretty amazing – it tastes like a cross between white chocolate and toffee and is as easy to make as melting white chocolate in the oven and giving it a stir every so often.

Both babkas turned out pretty decadent, even with the modest 100 grams of chocolate in each (Smitten Kitchen’s babka had about double that amount). Not exactly appropriate for a January detox after a chocolate-filled December, but I certainly wasn’t complaining. ;) Visit Sourdough Surprises to see some other mouthwatering babka!

Sourdough Brioche Babka

Sourdough brioche recipe adapted from Sourdough Companion, method from Bon Appetit. Babka technique from Smitten Kitchen and Purple Foodie. Be warned that brioche dough takes quite a long time to make – it needs several hours of rising time (mine took 5 hours) plus chilling time (several hours or overnight), so give yourself at least 2 days to get this done. Makes 2 large loaves.

Sourdough Brioche Dough

In a mixer bowl, combine:

250 grams 100% hydration starter

200 grams warm milk

Mix gently with a spatula until the starter is dissolved. Add:

500 grams all purpose flour

8 grams salt

With the paddle attachment, mix on low speed for 1 – 2 minutes until the dough comes together in shaggy lumps.

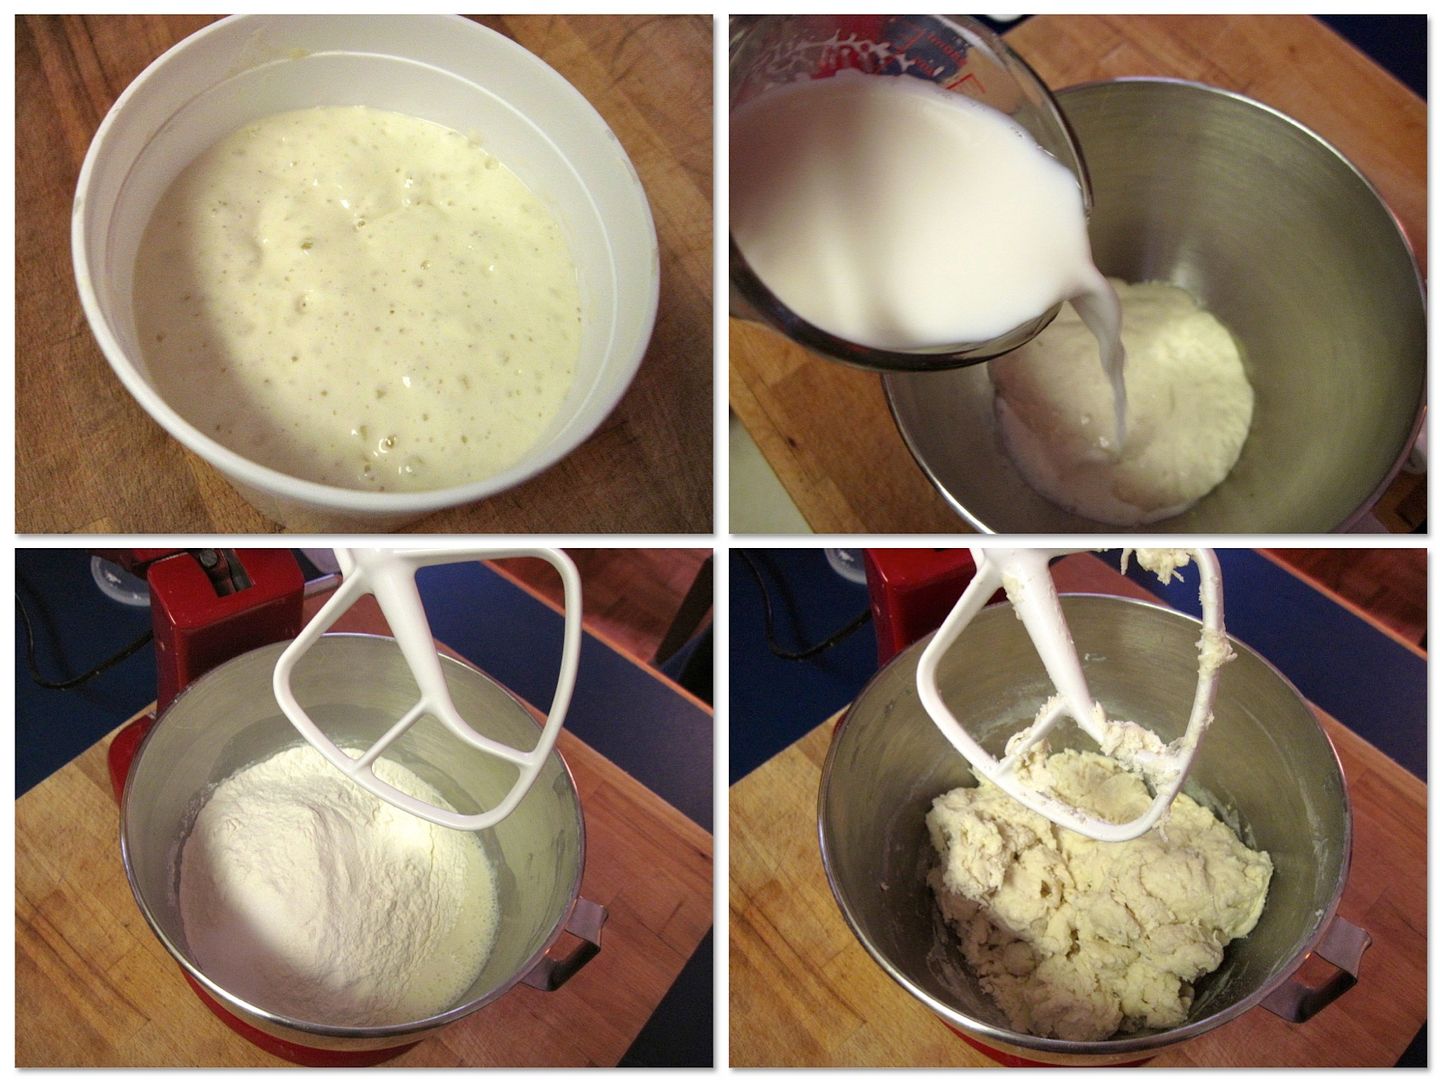
One at a time, stir in:

3 eggs

Stir well after each, then slowly pour in:

30 grams granulated white sugar

Increase the speed to medium and beat the dough until it is smooth, about 3 minutes. You might need to scrape it down off the paddle a few times.

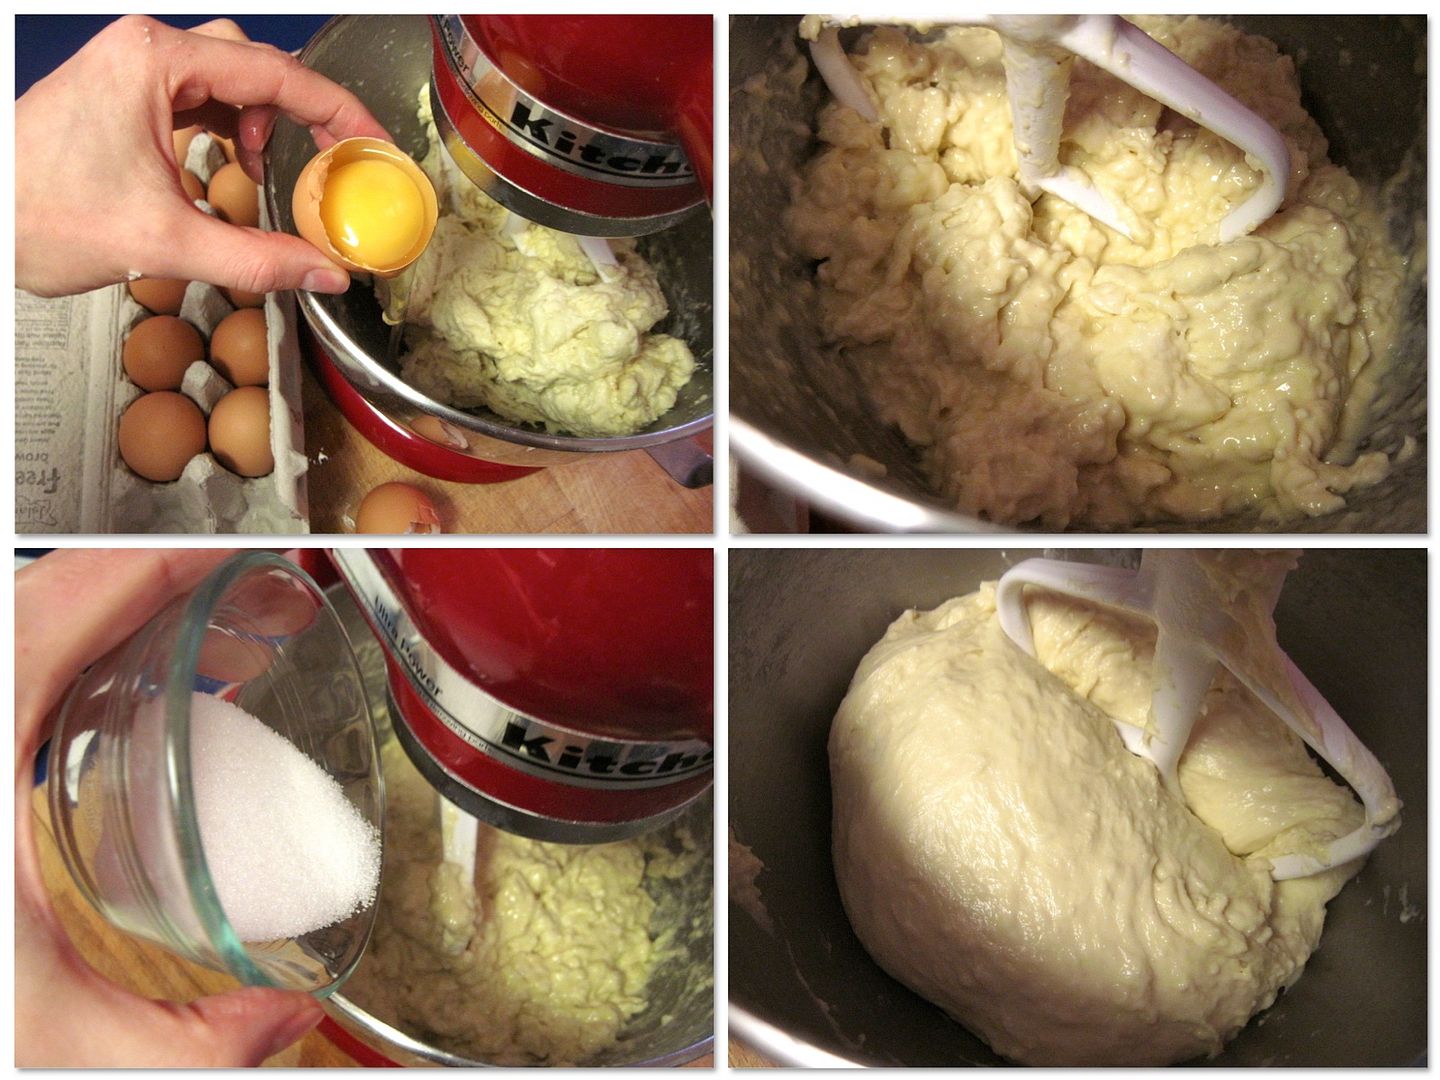
At low speed, add in very small increments:

300 grams softened unsalted butter

You will probably have to scrape the dough off the paddle several times. Once all the butter is added, scrape the dough out onto an unfloured surface and perform the “slap and fold” technique until the dough turns from a wet, sticky mess into an elastic, cohesive, smooth dough that cleans the surface you are working on (sorry, no pictures – it required both hands and was waaay too messy to pick up the camera!). This took about 8 – 10 minutes for me.

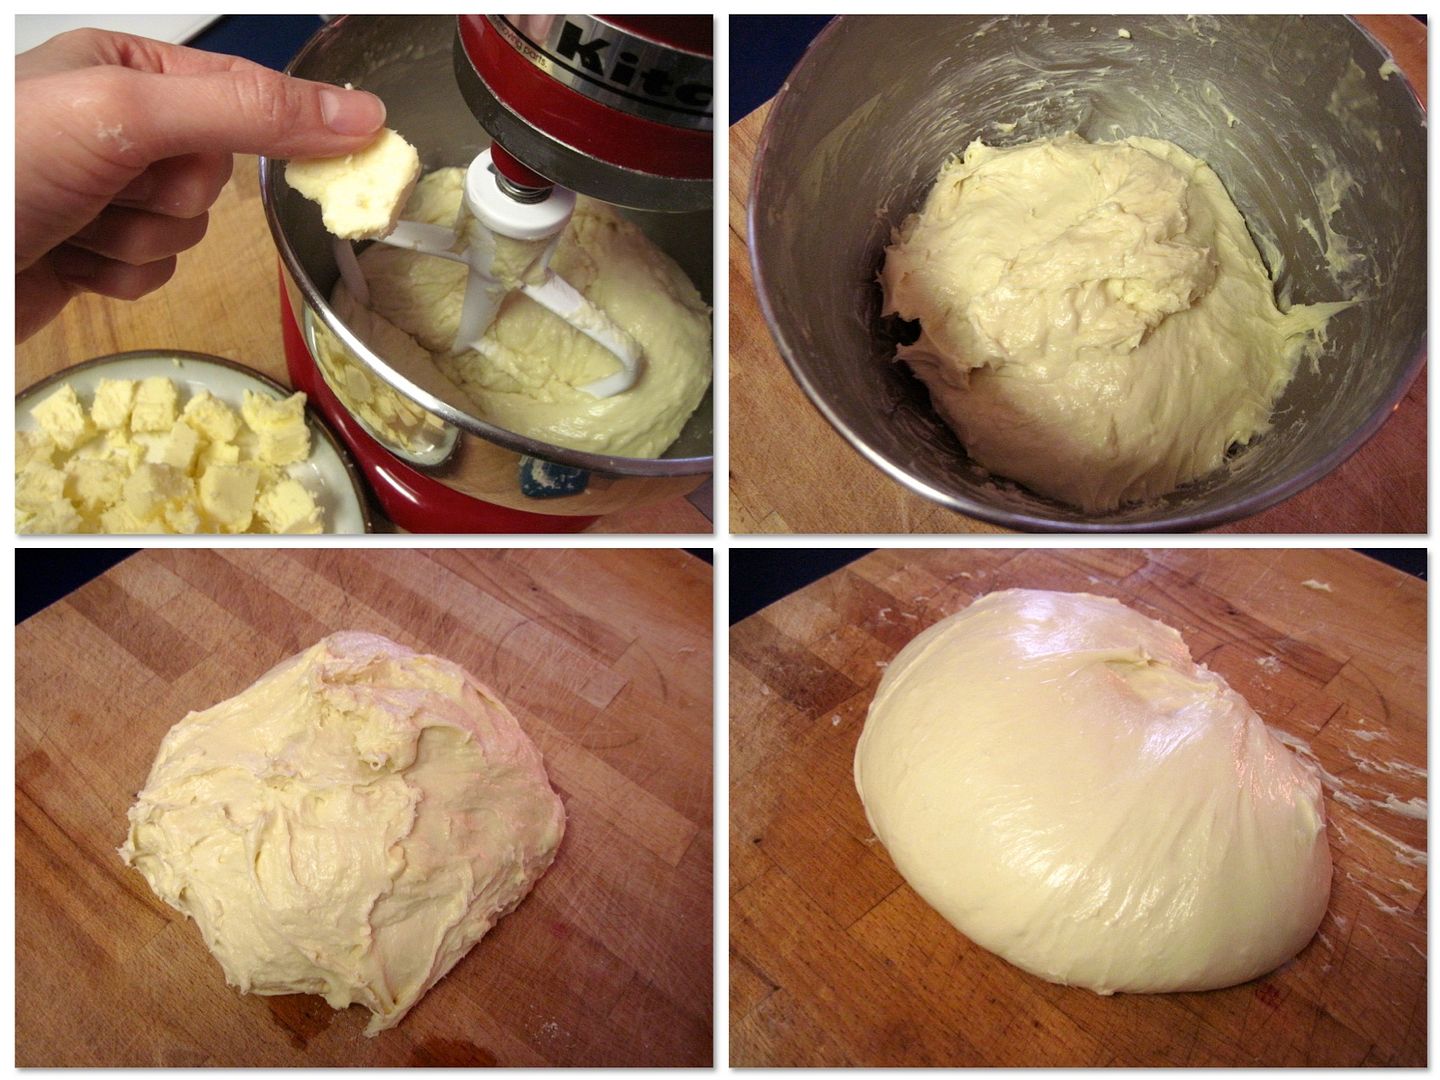
Gather it into a ball and place it in a buttered bowl. Cover with plastic and put in a very warm spot to rise until double. I turned my oven into a proofing box by turning on the lowest setting for about 2 minutes to warm it up just a bit, then turning it off and putting the dough in it with just the light on. Five hours later it was risen.

Chill the dough for several hours or overnight, until hard all the way through.

Meanwhile, prepare the chocolate filling.

Chocolate Filling

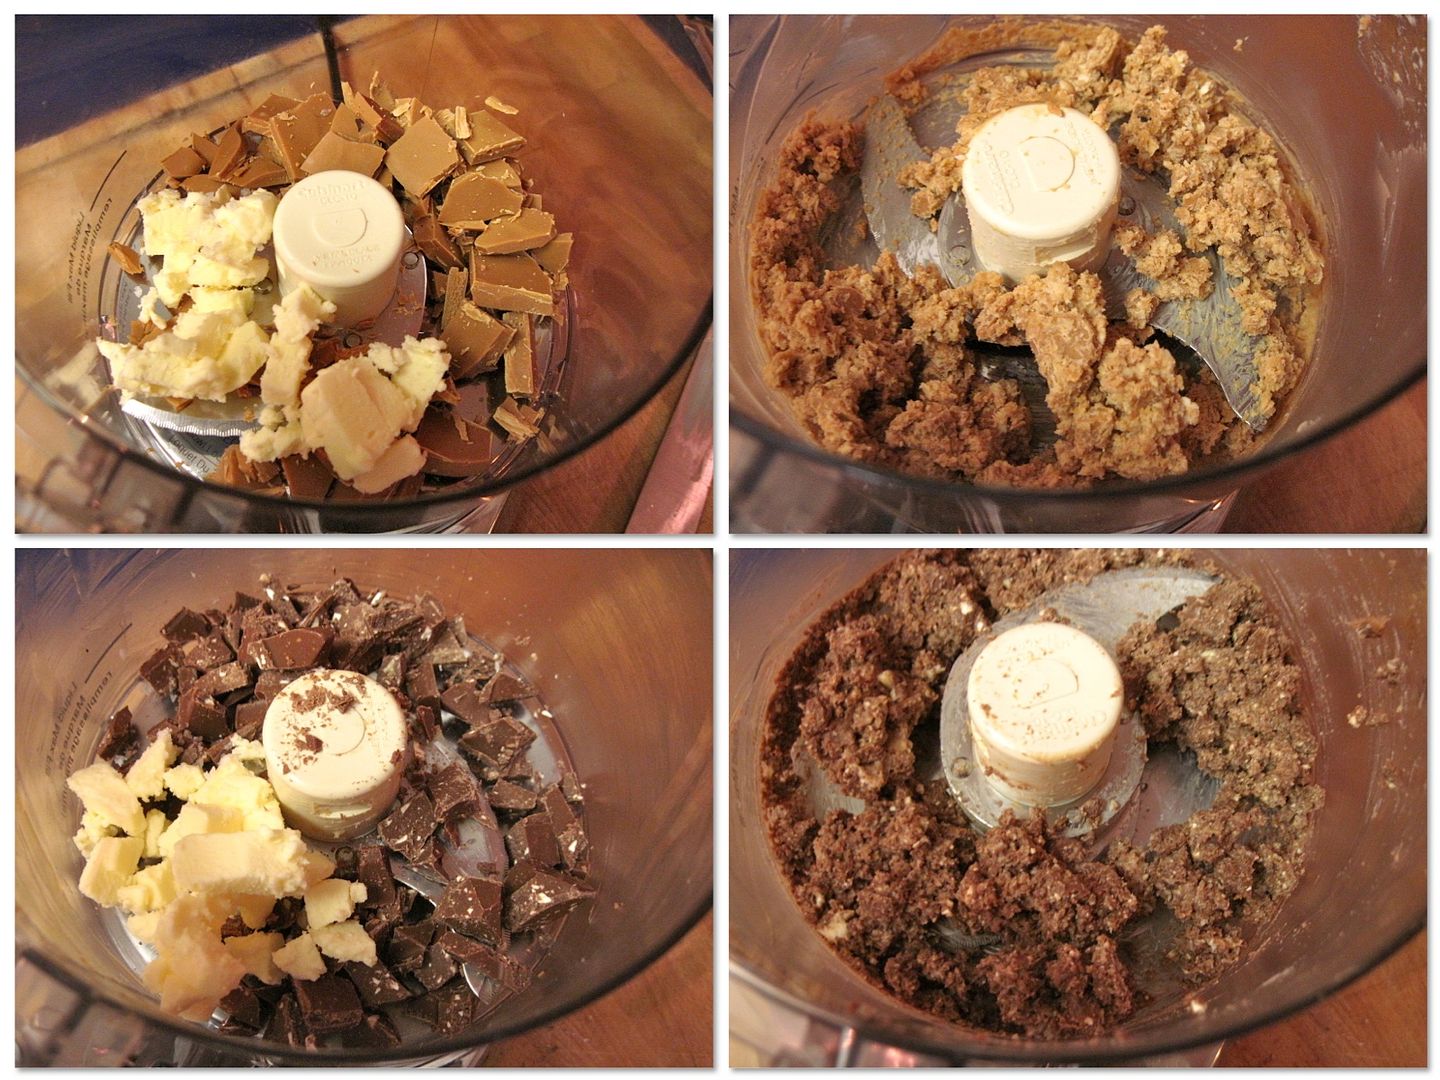
Place in the bowl of a food processor:

200 grams chopped chocolate, leftover from Christmas or otherwise ;)

4 tbsp unsalted butter

a big pinch of flaky sea salt (for milk and white chocolate fillings especially)

(I made two half batches of filling, one with a 100 grams of milk chocolate Toblerone and the other with 100 grams of caramelized white chocolate – recipe below.)

Pulse until the chocolate is in small bits and you have a spreadable chocolate-butter mixture.

Babka Assembly

Butter two 9″ x 5″ loaf pans and line them with parchment paper. Set aside.

Gently turn the dough out onto a floured surface and divide it in half. Roll/pat one half into a rectangle about 8″ x 16″ and spread it with half the chocolate-butter mixture. Do this carefully so the dough doesn’t tear. Roll the dough up from one short end into a tight spiral.

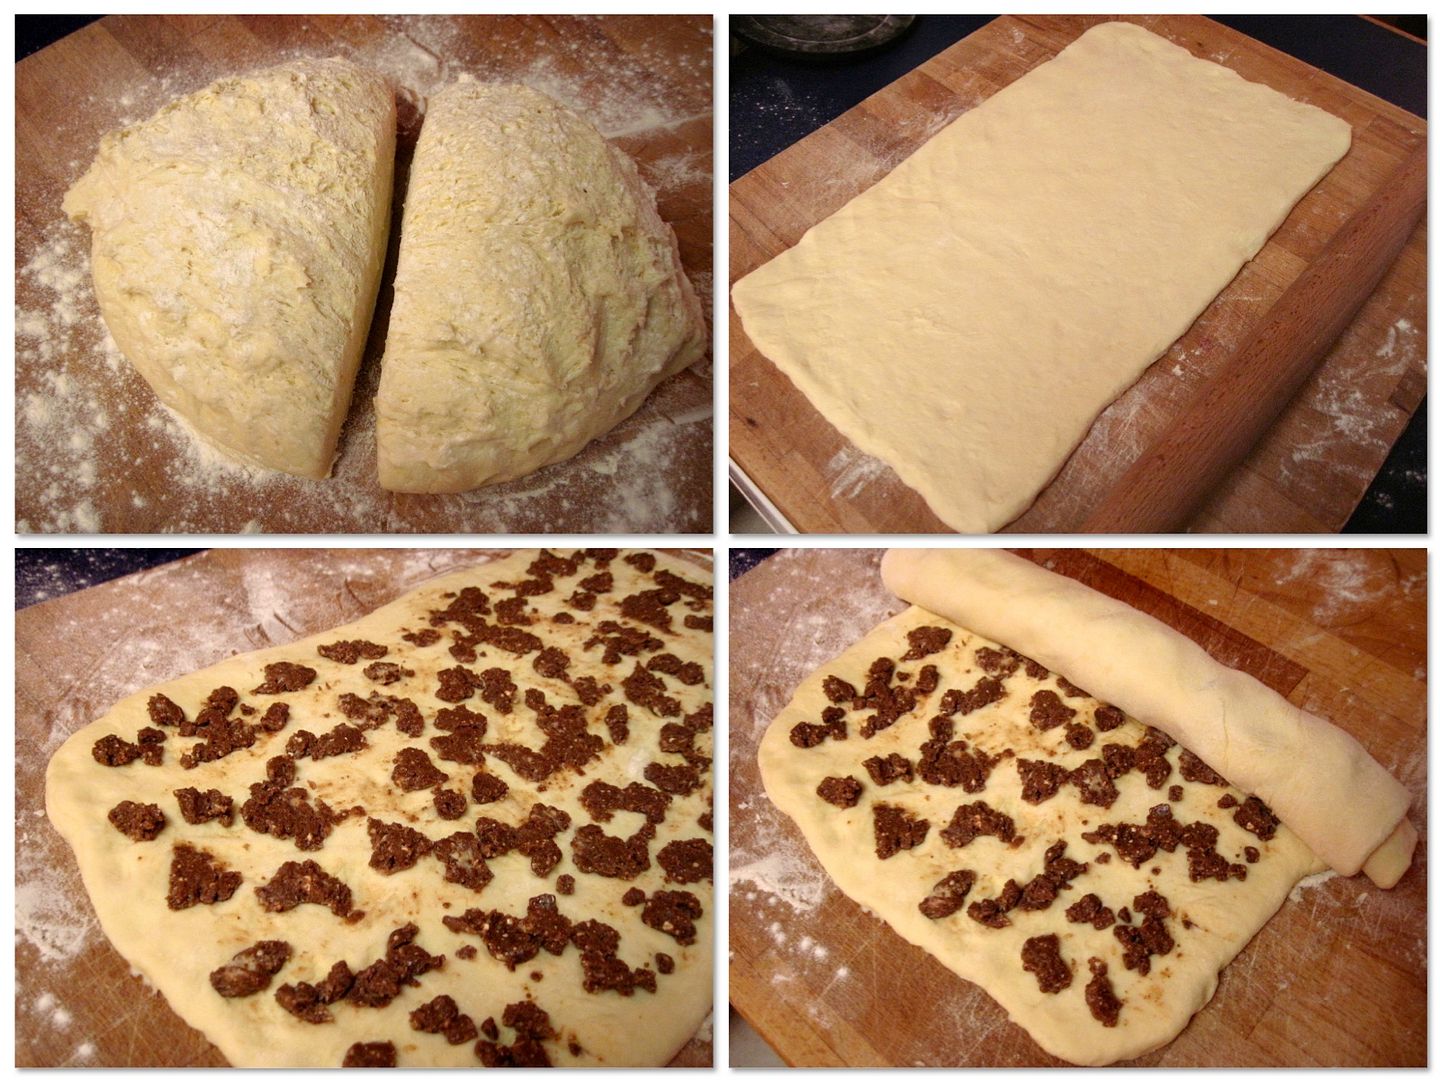
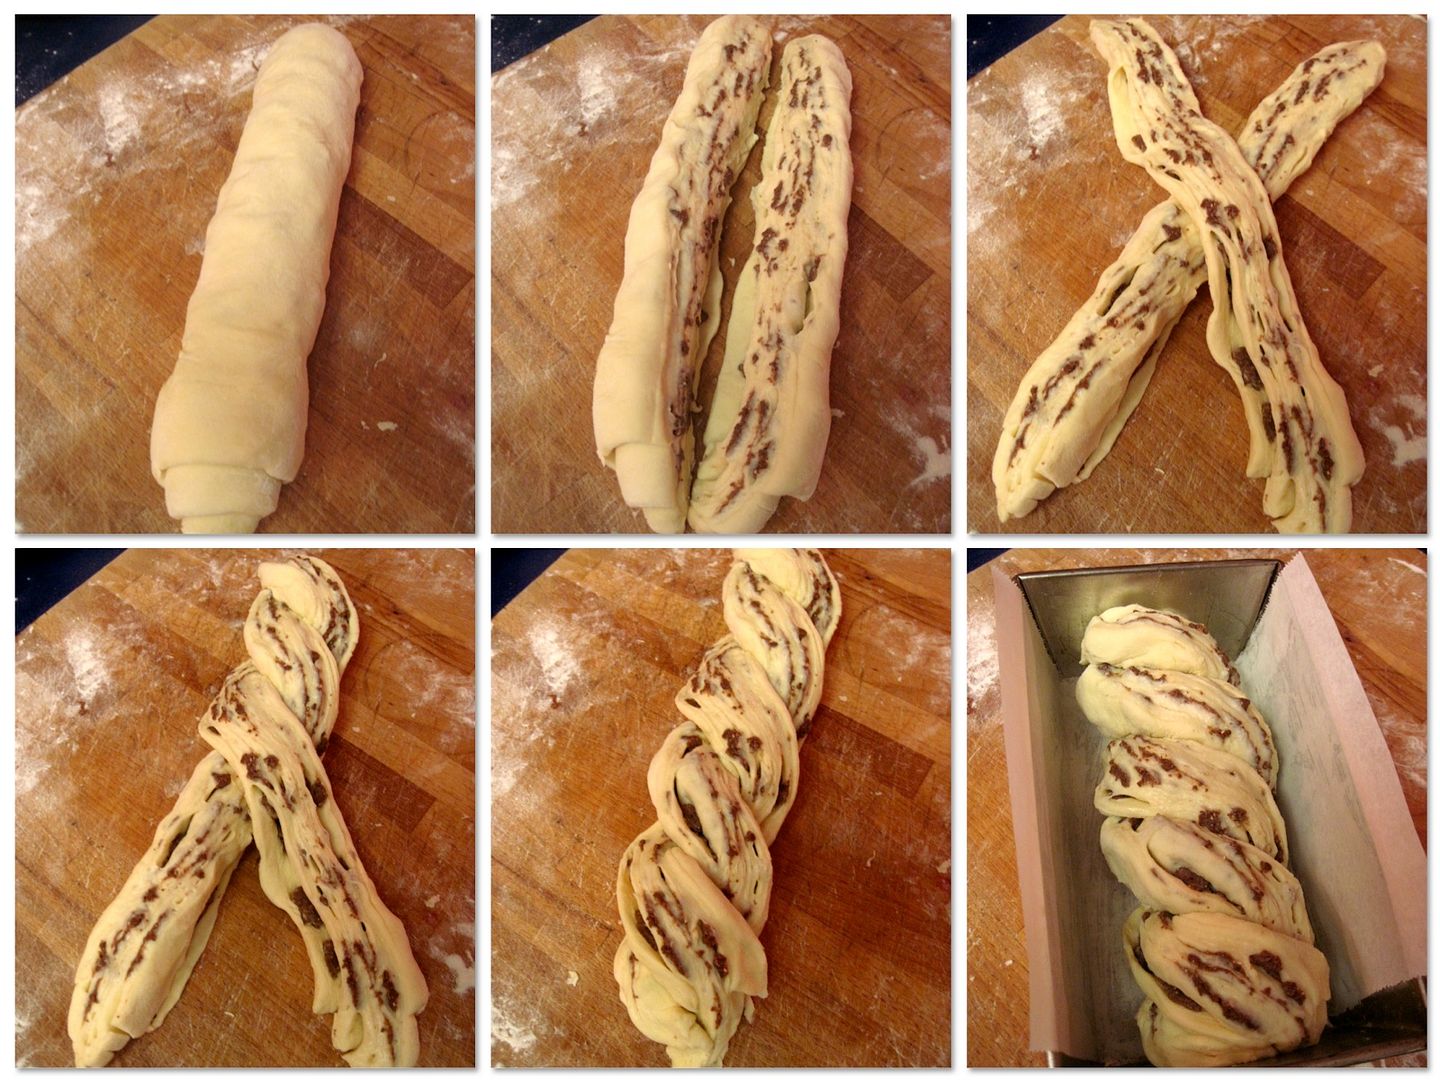
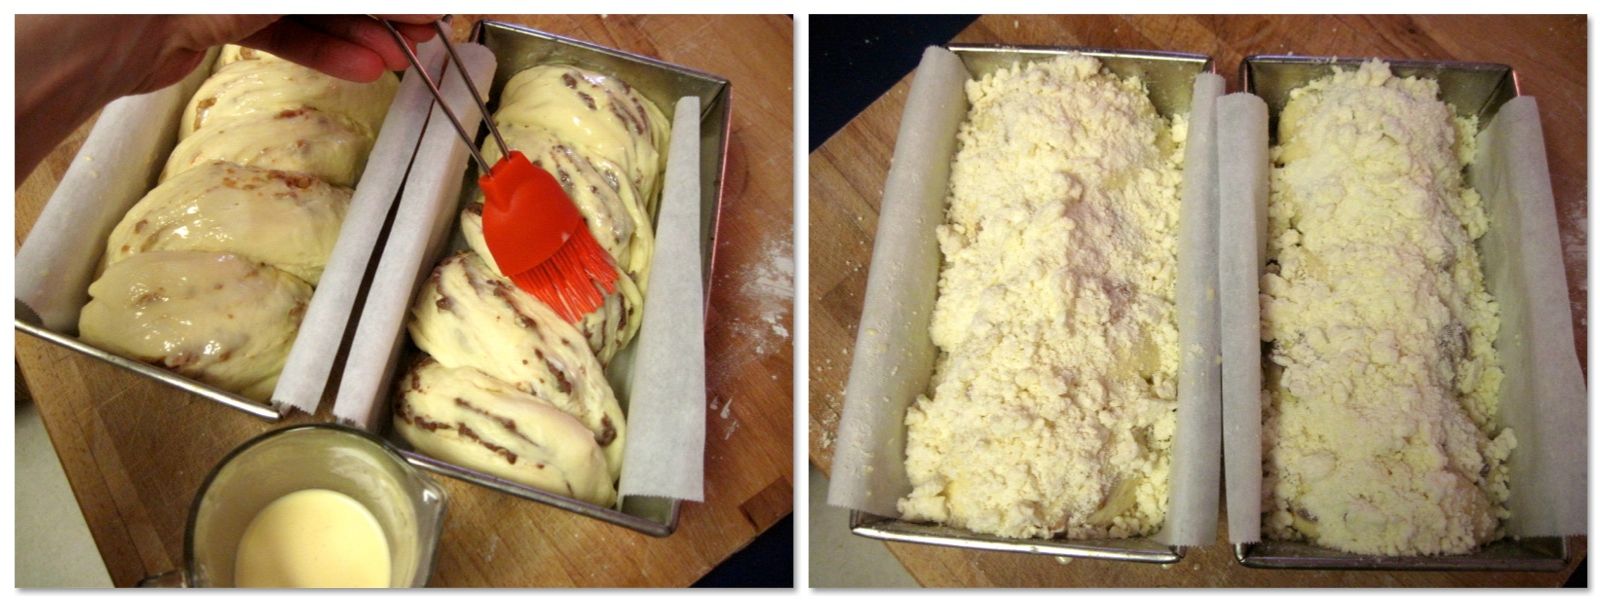
With a big knife, cut the spiral lengthwise down the middle. Cross the two halves in the middle, cut sides up, then twist them over themselves from the middle out towards each end, making sure to keep the cut sides facing up. Place the twist in the prepared loaf pan. Repeat with the second half of the dough.

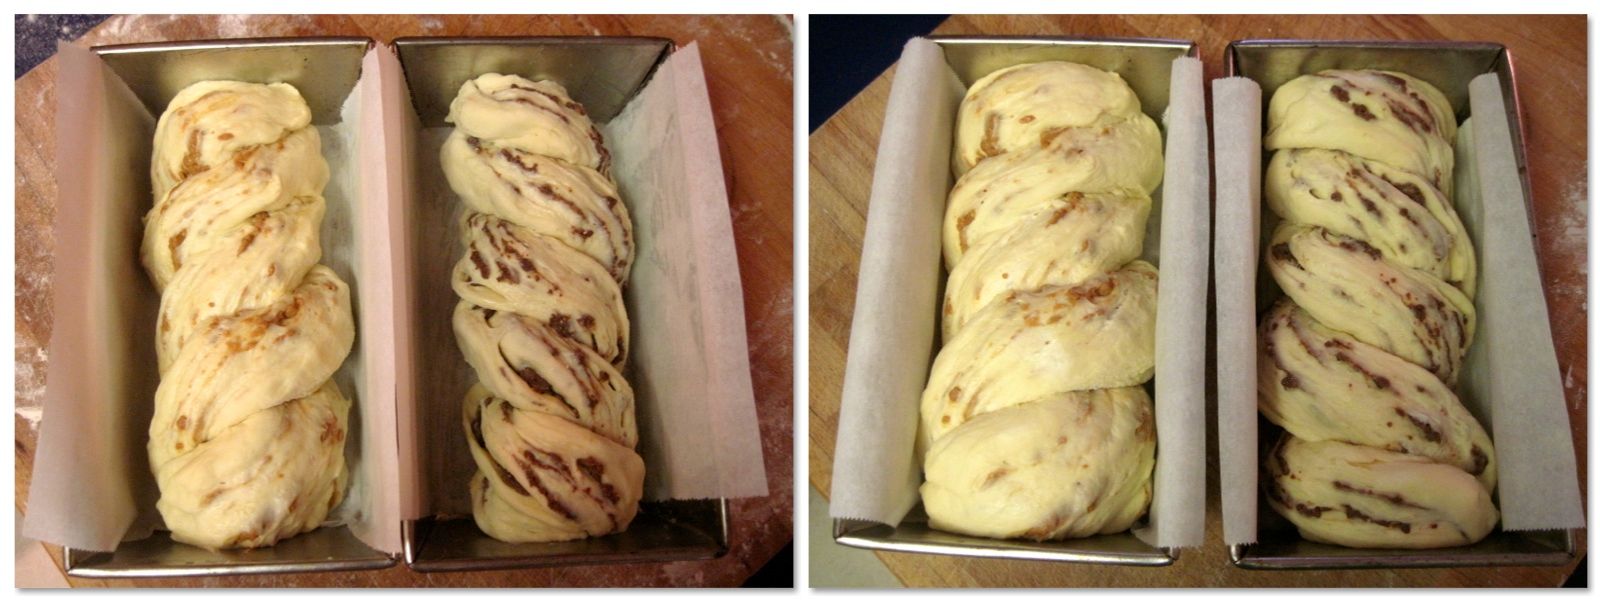
Cover lightly with plastic and let proof until expanded to touch the sides of the pan, probably an hour or two at room temperature. Or, you can let it proof for about an hour at room temperature, chill it overnight, then bring it back to room temperature in the morning and let it finish proofing (it might take quite a while for the dough to wake up after being chilled).

While the babka proof, preheat the oven to 350˚F and make the struesel topping.

Struesel Topping

In a bowl, mix together:

1 scant cup icing sugar

3/4 cup all purpose flour

a pinch of salt

Add:

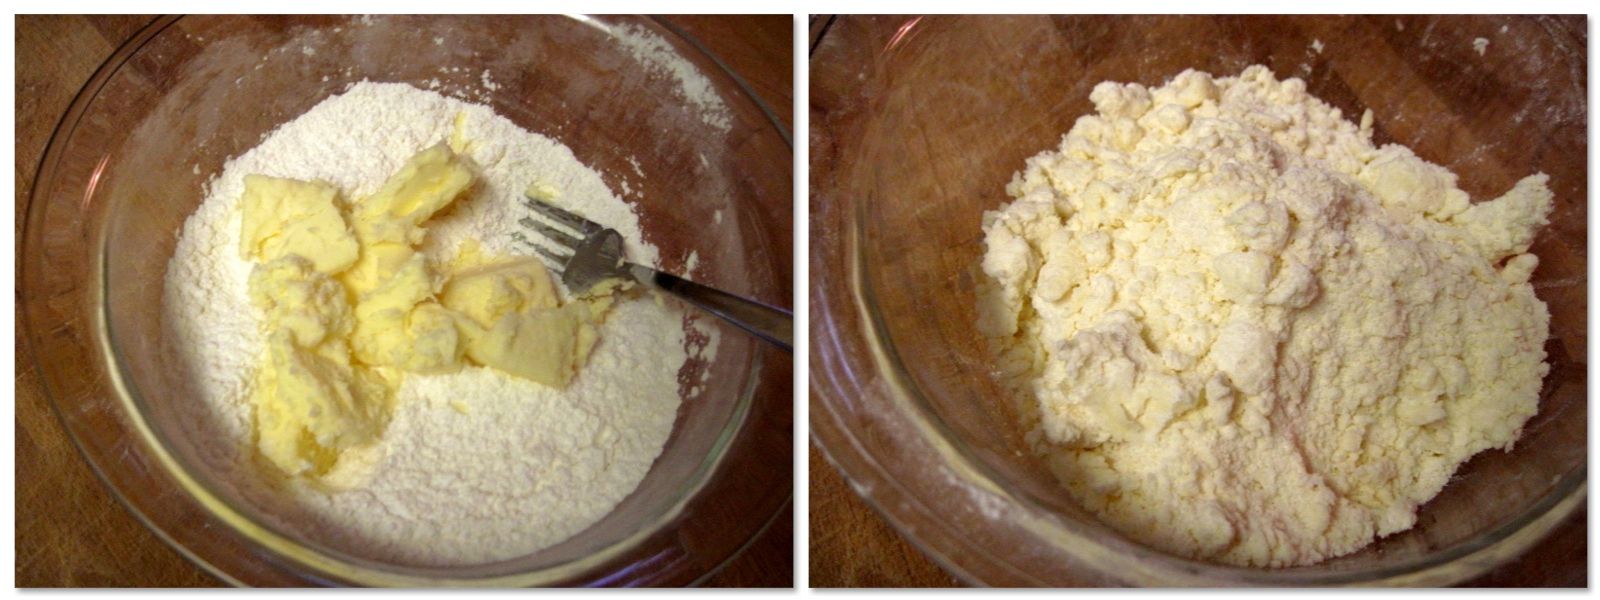
1/3 cup softened unsalted butter

Work in the butter with your fingertips until until crumbly, then press the crumbs together to create large clumps of struesel.

When the babka are proofed, brush them with an egg wash (1 egg + 1 tbsp cream or milk), then sprinkle them very generously with the struesel.

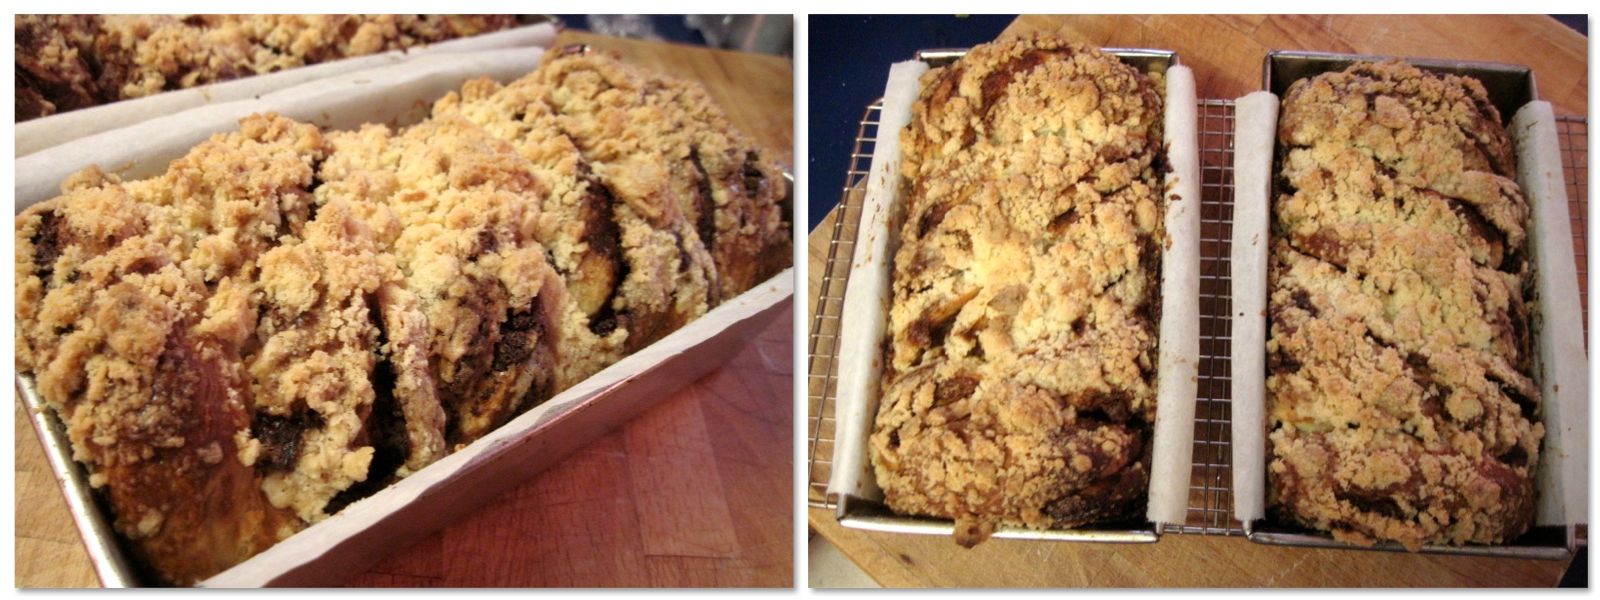
Bake in the preheated 350˚F oven for about 55 minutes, then reduce the heat to 325˚F and bake for 15 – 20 minutes, until deeply golden brown. Let cool in the pans on a rack, then remove from the pans to slice and serve. Store in an airtight container for up to a few days (if it lasts that long!).

Caramelized White Chocolate

Adapted from David Lebovitz

Spread your chopped white chocolate (I used 100 grams to fill one babka) over the bottom of a baking dish. Place it in a preheated 250˚F oven for 10 minutes, then stir with a spatula, spreading the chocolate evenly over the bottom of the baking dish. Repeat, heating the chocolate and stirring at 10 minute intervals, until it starts to brown and caramelize and turns the colour of natural peanut butter (about 30 – 60 minutes). It may clump up and look chunky, but it will smooth out eventually (you can add a little bit of cocoa butter or vegetable oil to help smooth it out if you are concerned). Stir in a pinch of flaky sea salt and pour the caramelized white chocolate into parchment paper and chill to set. Can be stored and used like regular white chocolate.

This post has been YeastSpotted!


Decorated Challah

0
0

decorated challahI always forget about Bread Baking Day, but this month it is being hosted by Jenni of the Gingered Whisk, so I made the effort to participate. The theme Jenni chose this month is bread with a decorated crust. I’ve been inspired by the gorgeous loaves of bread on this blog for a long time so this was the perfect opportunity to give it a try.

I made a batch of honey white challah dough from a past Daring Bakers challenge, shaping it into a simple oval loaf and then decorating it with curlicues of rolled dough – I think they look sort of like fiddleheads. I also tried to score the sides of the dough to stop it from cracking, but it didn’t work out so well. I think the dough was also a bit under-proofed, which can sometimes lead to cracking. But even with the big eruption in the middle, it looks pretty cool, and it tastes amazing – as challah tends to!

Shape the dough into a long oval, reserving about 1/5th of the dough for the decorations, and brush the loaf with water to make the curlicues stick.

Divide the extra dough into small pieces and roll them into skinny logs. Curl them up into little snails and trim them, leaving about a 1-inch tail.

Stick them onto the loaf, overlapping right and left, and placing the curled-up bit over the tail-end of the previous curlicue.

Finish off the fiddlehead pattern with an S-shaped curlicue.

Cover lightly with a tea towel and proof in a warm spot for 30 minutes or longer, until you can poke the dough with your finger and the indent remains. Brush the whole loaf with an egg wash and bake until dark brown (see the honey white challah recipe for baking instructions).

A round-up of all the Bread Baking Day #56 loaves will be posted on Jenni’s blog, so be sure to check it out. This post has also been submitted to YeastSpotting.


The Ultimate Focaccia

0
0

Nancy Sivertson's FocacciaThere is a restaurant in Victoria called Pagliacci’s that is famous for its focaccia bread: light, fluffy, chewy, flavourful, and baked in olive oil so that the crust is both crunchy and almost buttery at the same time. I know several people who go there just for the bread (myself included), and it stands to reason that making a Pagliacci’s taste-alike focaccia was on my List.

So when I saw an amazing looking focaccia on the YeastSpotting round-up last week, I decided to make it immediately. The real kicker was that one of the topping variations was olives and mozzarella, both of which I happened to have in the fridge. And the result… is the best focaccia I’ve ever tasted (Nate concurs).

The dough starts the night before with a preferment sponge made with a tiny amount of yeast. The next day, when the sponge has developed lots of good yeasty flavour, you mix up the dough, which contains a little bit of rye flour for even more flavour. Once the dough has risen into a beautiful, bubbly mass, it gets pressed into an olive oil-slathered pan and topped with rosemary and other delicious things. Then it goes into the oven and perfumes your house with the most incredible aroma until it emerges, golden brown and crisp. So. Good.

And even better when dipped into basil-infused olive oil and blackberry balsamic vinegar (this stuff is heavenly!). Easily the best thing I’ve eaten so far in 2013.

PS – That maple syrup festival I was so excited about in my past post? Yeah, I missed it. :( I thought it was on Sunday but it was actually on Saturday, and I realized this about 20 minutes after it ended. Sigh. I guess I’ll just have to look forward to next year!

Nancy Sivertson’s Focaccia

Adapted from the LA Times, via Elra’s Baking. Makes two 10″ round or square focaccia.

The day before, make the sponge. Mix together in a mixer bowl:

1/2 cup bread flour

1/2 cup warm water

1/16 tsp active dry yeast

It will have the consistency of pancake batter. Cover the bowl with plastic wrap and let it ferment for 12 – 24 hours at room temperature, until nice and bubbly.

To make the dough, mix into the sponge:

1 1/4 cups warm water

1 tbsp olive oil

Stir to combine, then add:

3 2/3 cups bread flour

2 tbsp + 3/4 tsp rye flour

1 3/4 tsp active dry yeast

Mix with a dough hook on low speed for about 2 minutes until you get a sticky mass.

Add:

3/4 tbsp kosher salt

Increase the speed to medium and continue kneading until the dough is smooth and well-formed, about 8 – 10 minutes. It should be too sticky to “clean the bowl”, but it should be pulling away from the sides.

Put the dough in an olive oiled-bowl and cover it tightly with a double layer of plastic wrap. Place it in a warm spot to rise until doubled, about 1 1/2 hours. After 1 1/2 hours, stretch and fold the dough in all four directions (explanation and video demonstration here). Cover and let rise again until double, 50 minutes to 1 hour.

Prepare two 10″ round or square tins by 1/4 cup olive oil into each and swirling it around to cover the bottom and sides. Divide the dough in half (each should weight about 1 lb) and gently stretch and press each one into the bottom of the pans. Dip your fingertips into the oil to cover the bread with oil as you shape it. Cover the pans with a tea towel and let rest for 30 minutes.

Once rested, it’s time for toppings. For one focaccia, I used:

1 ball of bocconcini, cubed and pressed between paper towels to remove excess moisture

10 black kalamata olives, whole, and 5 large green olives, halved

a handful of fresh rosemary sprigs (next time I would just scatter rosemary leaves on top, rather than using individual sprigs)

Press the mozzarella deeply into the dough, starting in the middle and working in circles out to the edge, pressing the dough out towards the edges of the pan as you go. Repeat with the olives and then poke the rosemary sprigs into the dough/scatter leaves on top. Sprinkle with a scant 1/2 tsp of large flake sea salt (like Maldon salt).

For the plain rosemary version, use your fingertips to stipple the dough, then poke in the rosemary sprigs/scatter the leaves on top. Sprinkle with a scant 1/2 tsp of large flake sea salt (like Maldon salt) and a few turns of freshly cracked black pepper.

Cover the pans with a tea towel and let rest for another 3o minutes, until the dough has risen up around the toppings.

While the dough rests, preheat the oven to 450˚F. Place the risen dough in the oven and turn it down to 400˚F. Bake for 30 – 40 minutes until crisp and golden brown. The square pan took 30 minutes and the round one could have used 40 minutes – it was not quite as crisp underneath after only 30 minutes.

Remove the focaccia from the pans immediately and place on a rack. Brush/dab with more olive oil and let it cool slightly before cutting into wedges and devouring.

This focaccia is best eaten fresh, but you can warm it in the oven or toaster to crisp it up a day or so after baking.

This post has been YeastSpotted!


Lemon Heart Danishes

0
0

Lemon Heart DanishesValentine’s Day. An excuse for heart-shaped baking. I’m in!

Lemon is my favorite sweet/dessert flavour second only to chocolate, but it’s hard to buy decent lemon baked goods. I hate fake lemon even more than I love real lemon, and unfortunately most of the time, store-bought lemon-flavoured things are pretty dreadful. So in the case of lemon, it’s best to take matters into your own hands.

I recently found out that Nate’s favorite Danishes are lemon, which meant that I obviously had to make some myself (see above). The last time I made Danishes it was a long and drawn out process, so I asked the Google machine for a quick Danish pastry recipe and it came up with this one by Scandinavian pastry chef Beatrice Ojakangas. This recipe appears in the very popular cookbook “Baking with Julia” by Dorie Greenspan, and employs what is apparently (according to something I read on the internet, so you know it’s true!) the most widespread method used in Danish-making countries (ie, Denmark, I guess).

In this “quick method”, rather than enclosing a block of butter in the dough, you cut the butter into the flour, similar to making pie dough or scones (essentially, it’s a rough puff version of Danish pastry). You go through the same rolling and folding and rolling and folding (and rolling and folding), but it is a much more forgiving process that doesn’t require endless chilling and neurotic trimming of edges. You don’t get quite the same flaky layers as traditional laminated dough, but it’s considerably faster and definitely better than most Danishes you can buy in a store (especially the lemon ones!). The dough requires an overnight rest in the fridge, so in the morning you can take it out, give it a few folds, then shape and bake and have fresh Danishes for your Valentine – or you could have, if I’d gotten this post up before today! ;) Your co-workers will also be quite pleased if you share with them (I speak from experience).

I filled the Danishes with a lemon curd made with a rather unique method, which I will share in the next few days. In an attempt to make these pastries even more Valentine’s appropriate, I tried to make little hearts of raspberry purée in the lemon curd, but it didn’t work out so well (they looked like blobs) and I ended up just swirling the raspberry into the curd – which bubbled up in the oven, so even if the hearts had looked like hearts, they wouldn’t have survived. So I would either skip the raspberry purée altogether (it didn’t make a difference to the taste) or for a proper lemon-raspberry Danish, top each with a few whole raspberries before baking.

Happy Valentine’s Day, friends. I hope you are feeling the love, today and always!

Lemon Heart Danishes

Makes 20 medium Danishes

Quick Danish Pastry

Adapted from Beatrice Ojakangas

In a measuring cup, combine:

1/4 cup very warm water

1 package / 2 1/4 tsp active dry yeast

Stir and set aside until the yeast starts to foam and look creamy.

In a small bowl, whisk together:

1/2 cup milk, at room temperature

1 egg, at room temperature

1/4 cup sugar

1 tsp salt

Stir the now-foamy yeast into the milk-egg mixture.

(Totally optional: stir in a few spoonfuls of discard sourdough starter.)

In a larger bowl, place:

2 1/2 cups all purpose flour

With a pastry cutter, cut in:

1 cup / 8 oz cold, unsalted butter, cubed

Cut the butter until it is in 1/4 inch pieces (this can also be done in a food processor).

Pour the yeast mixture into the flour mixture and fold gently with a spatula to combine. Do this gently as you want the butter to stay in discrete pieces.

(Optional step: I turned the dough out onto a lightly floured surface and did a few frissage passes to try to make the butter pieces long and flat, which is supposed to mean flakier pastry. I don’t know if it made a difference or not.)

Cover the bowl containing the dough with plastic wrap and refrigerate overnight, or up to 4 days.

To finish the dough, turn it out onto a floured surface and pat it into a square shape. With a rolling pin, roll it out into a 16″ square. Fold it into thirds, like a letter, then turn it so the closed edge is on your left. Roll it out again, this time into a long rectangle measuring 10″ x 24″. Again, fold in thirds to make a square, and turn so the closed edge is on your left. Roll into a large 20″ square. Fold in thirds once more to make a rectangle, then again to make a square.

If the dough/butter gets too soft during this process, chill it for about 30 minutes to firm it up. It’s important that the butter doesn’t melt into the dough, otherwise all your rolling and folding will be for nought. Also, try your best to roll the dough out to the specified dimensions, which will make the final roll out when you shape the dough much easier. Be patient and give it a minute to relax if it resists rolling.

Wrap the square of dough in plastic and chill for at least 30 minutes or until firm. It can be refrigerated for up to 4 days, or frozen for 1 month, tightly wrapped (thaw overnight in the fridge).

Danish Assembly

Heart shaping method adapted from Blissfully Content

Roll the chilled dough out on a floured surface into a 20″ square. Try to keep the edges as neat and square as possible, but no big deal if it’s not perfect. Cut the large square into 20 small squares: cut into 4 x 5″ strips in one direction, then cut perpendicular into 5 x 4″ strips. This will give you 20 squares measuring 4″ x 5″. Roll up each little square from one longer side.

With the seam facing up, fold the roll in half so that the top end slightly overlaps the bottom end. Pinch the ends together and press the whole thing slightly. With a sharp knife, cut the folded roll down the middle to make two “ears”, stopping about 1 cm from the loose ends. Unfold the “ears” to form a heart.

Place the hearts on a baking tray lined with a silicon mat or parchment paper. Cover loosely with plastic and let proof at room temperature for 30 – 45 minutes, until puffy. While the Danishes proof, preheat the oven to 375˚F.

With the back of a lightly floured spoon, press a slight indent in the the middle f each heart. Fill the indent with about 1 tbsp of lemon curd (you will need about 1 1/3 cups of lemon curd total). For lemon-raspberry Danishes, top the lemon curd with a few whole raspberries (skip the raspberry purée!). Bake the proofed, filled Danishes in the preheated 375˚F oven for about 20 – 25 minutes, until puffed and darkly golden brown. Cool on a rack.

Stir together an icing of 3/4 cups icing sugar and a few tsp milk to make a thick yet drizzly icing. Place the icing in a Ziplock bag, snip a tiny bit off one corner of the bag, and drizzle the icing over the cooled Danishes. Let the icing set before serving.

These are best eaten the day they are baked, but I’m certainly not complaining three days later! (Store in an airtight container.)

This post has been YeastSpotted!


Ethiopian Injera

0
0

Ethiopian InjeraA few years ago I had lunch with my Mum at an Ethiopian restaurant in Vancouver. Never having had Ethiopian food before, I had no idea what to expect, other than my Mum telling me that we would be eating “injera” made from “teff”, which really didn’t do much to clear things up.

What arrived at our table was a giant, crèpe-like flatbread covered in dollops of several kinds of thick, curry-like stew, to be shared between the two of us. Eating with our hands, we tore off pieces of the crèpe and used it to scoop up the stew, which was spicy and flavourful and incredibly delicious. The crèpe, as it turned out, was called injera, and it was made from a grain called teff (which happens to be gluten-free). It had a pleasant, almost spongy texture and slightly sour flavour, due to it being made with a sourdough starter of sorts. Along with being one of the most unusual eating experiences I have ever had (it’s not everyday in Canada that an edible part of your meal serves as both plate and eating utensil), that lunch was also one of the most memorable and delicious.

Since then, I had kept the notion of making injera in the back of my mind, but it wasn’t until I saw it as one of the suggested recipes for this month’s Sourdough Surprises flatbread project that it came to fruition. Traditionally, injera is made from a pre-fermented starter of teff flour, but it can easily be made with a wheat flour sourdough starter, which is what I used. It did require finding teff flour, but a trip to the local health food store had me sorted, and from there it really could not have been easier: you mix up a soupy concoction of sourdough starter, water, and teff flour, then let it ferment for several hours until it gets bubbly, then swirl it in a frying pan and cook it much like a French crèpe, only you don’t have to flip it. The injera develops its distinctive spongy texture after cooking, as it cools a bit.

The traditional Ethiopian stew served on top of injera is called wat, made from meat or vegetables and flavoured with a spice mix called berbere, which is analogous to curry powder in that there are as many variations as there are cooks. Several kinds of wat are usually served on a large communal injera, so I made a delicious approximation of this Ethiopian lamb stew (using an approximation of this berbere seasoning) along with a rather uninteresting and decidedly non-Ethiopian lentil dal to dollop on my injera. Any kind of thick, spicy stew or curry would be appropriate, too. (For more about Ethiopian cuisine, I found this page interesting.)

All in all, a pretty fun project and a good way to shake things up at dinner time!

Check out the Sourdough Surprises blog to see what other flatbreads were made this month using sourdough. :)

Ethiopian Injera

Adapted from Apple Pie, Patis, & Pàté. Makes 5 – 6 injera, 10″ – 12″  in diameter. Traditional injera are up to 20″ in diameter, but good luck finding a frying pan that size! The recipe below uses a wheat flour sourdough starter. To make a teff starter (which takes 5 days), check out this post.

In a large bowl, mix together:

1/4 cup sourdough starter

1 3/4 cups room temperature water

Stir to dissolve the starter, then add:

1 3/4 cups teff flour

Mix the batter until it is smooth. It will be quite thin, like crèpe batter.

Cover and let ferment at room temperature for 5 – 6 hours. After several hours, my batter developed a layer of water on top, and then about an hour later, the water had disappeared and and it had started to produce foamy bubbles. I took that to mean it was ready.

At this point, you can reserve 1/4 cup of the batter to keep as the starter for your next batch. I didn’t do this – I only need one kind of sourdough starter to babysit, and this was easy enough to make with the one I already have.

With a whisk, stir in:

1/4 tsp salt

The batter should be quite active now – I could actually watch it foam and ferment, which was pretty neat.

Heat a 10″ or 12″ non-stick skillet over medium heat (the skillet needs to have a lid, too). Test the skillet’s heat by flicking some drops of water on it: if they sizzle and dance, it should be ready. Pour 1/2 cup (for 10″ skillet) to 3/4 cup (for 12″ skillet) of batter into the skillet and swirl it around to coat the bottom. Bubbles should appear on the surface almost immediately. Cook for about a minute, until the outer inch of the injera starts to set.

Cover with the lid and cook/steam for another minute or so, until the middle of the injera is just set as well and the edges start to pull away from the pan.

Remove the injera by inverting the skillet and dumping the injera out upside down. Move it to a rack to cool slightly. (Note: like crèpes, the first injera might be a total disaster. The next ones will be better!)

The injera can be served warm or at room temperature. They can also be stored for up to 3 days in an airtight container at room temperature. To re-heat, wrap them in a damp cloth and microwave for a minute or two, until warm. I did this, but next time I would serve them the day I make them because they got pretty crumbly.

To serve, place an injera on a plate and top it with dollops of thick stew (too much liquid or sauce will make the injera soggy). Cut the remaining injera into strips and roll them up to serve alongside.

To eat, tear off pieces of the injera with your fingers and scoop up the stew with it. Make sure you have lots of napkins handy!

This post has been YeastSpotted!


Friday Night Pizza

0
0

Cheesy Sausage, Jalapeño and Fresh Tomato PizzaEvery couple Fridays, Nate and I make homemade pizza for dinner. This is one of the rare times we are actually in the kitchen making dinner together (something I would like to do more often), me stretching out the dough, Nate shredding cheese and slicing toppings, deciding together what to put on each pie. We always do one Blue Hawaiian, and the second is usually a mish-mash of whatever else we have on hand – salami, olives, sautéed mushrooms and onions, chopped bell peppers… Last week at Aaron’s birthday pizza dinner, Nate and I shared the pizza special of the day, which was topped with crumbled homemade Italian sausage, fresh sliced Anaheim peppers, and cherry tomatoes on a creamy, cheesy base. It was such a good, simple combination of flavours that I knew I wanted to add it to our homemade pizza topping arsenal. I feel a bit silly posting an actual “recipe” for a pizza because I never follow one myself, so instead here’s the basic rundown for this cheesy sausage, jalapeño and fresh tomato pie.

Stretch out your favorite pizza dough onto a lightly oiled baking sheet (I love this pizza dough – I use a little bit of whole wheat flour and freeze half the dough for our next pizza night). Drizzle it with a few tablespoons of heavy cream (spread it around) and shower it with a good amount of freshly grated parmesan cheese and a few shreds of mozzarella.

Scatter it with some cooked and crumbled homemade Italian sausage, some sliced fresh jalapeños (or Anaheim peppers, if you can find them), and a few quartered grape or cherry tomatoes.

Sprinkle with a bit more mozzarella (less is more in this case – I find too much cheese keeps the crust from cooking properly) and bake in a hot oven until the crust is golden and the cheese melted and browned. Let it rest for a few minutes, then sprinkle with more parmesan and some black pepper before cutting into wedges.


Chocolate Porter Sourdough Hot Cross Buns

0
0

Chocolate Porter Sourdough Hot Cross BunsHappy Easter! I hope the Easter Bunny brought you all lots of chocolate. :)

This Easter I wanted to make some special hot cross buns (as in, more special than these or these). I was thinking something along the lines of “hot cross bunnies” (haha, I’m so punny… bunny… sorry) but then I came across these spiced stout sourdough beauties from Lauren Bakes (she recently posted a chocolate chip version, too), which stopped me dead in my cutesy little bunny tracks. Her recipe contained dried fruit soaked in tea plus a sourdough levain made with Guinness, which I swapped out for chocolate porter because, well, I’ll take any excuse to buy it, really.

The resulting buns are deeply spiced and studded with loads of fruit, yet have a surprisingly light crumb and, of course, they taste awesome. I used a combination of raisins, dried cranberries, and dried apricots along with candied orange peel, which plays well off the slight chocolate hint from the porter in the dough.

Despite the fact that I managed to take almost 36 hours to make them start to finish, they were actually very easy and didn’t even require kneading. All you need is sourdough and beer, two things I am very fond of and one of which I have in the fridge at all times. (I’m referring to my sourdough starter, I swear.)

Chocolate Porter Sourdough Hot Cross Buns

Adapted from Lauren Bakes, who adapted it from Dan Lepard. Makes 20 buns.

The night before you want to bake, make the levain and soak the fruit. For the levain, combine in a LARGE bowl:

150 g bubbly sourdough starter (100% hydration)

375 ml chocolate porter, such as this one (or any other dark, flavourful beer)

1 1/2 tsp each ground cinnamon, allspice, and powdered ginger

Mix well to completely dissolve the starter in the beer (it will be very foamy at first).  Cover and let it ferment at room temperature overnight.

For the fruit, combine:

100 grams each diced candied orange peel, dried cranberries, raisins, and diced dried apricots (400 grams total dried fruit)

200 ml hot black tea

Stir, cover, and let soak overnight at room temperature along with the levain.

The next morning, the levain should be bubbly, slightly puffed, and quite jiggly.

To the soaked fruit, add:

1 large egg, lightly beaten

50 grams melted butter

Stir the fruit mixture into the levain, then add:

550 grams all purpose flour

50 grams granulated white sugar

1 1/2 tsp salt

Mix well to form a slightly sticky dough – you may have to get in there with your hands to mix it, but resist the urge to actually knead.

Once you have a cohesive dough, let it rest for 10 minutes, then stretch the dough by grasping it from one edge, pulling it up, and tucking it across to the other side of itself. Do this several times, rotating the bowl as you go, until the dough has been stretched in all directions. Cover and let rest for 30 minutes, then repeat the stretching.

Let it rest another 30 minutes, then perform a fold of the dough: take it out of the bowl and stretch it out slightly into a rectangular shape. Stretch and fold it into thirds, like a letter, then fold it in half. Cover and let rest for an hour, the repeat the folding again. Cover and rest for 2 hours. (Note that extra time between each stretch and/or fold is not going to do any harm, especially if the temperature of your kitchen is a bit on the cool side.) Now you’re ready to shape the dough.

Divide into 20 pieces, about 100 grams each. I did this by patting the dough into a rectangle, cutting it into 4 strips lengthwise, then cutting each strip into 5 pieces. I then weighed each piece as I shaped it, adding a little extra dough or taking some off as necessary. Shape each piece into a ball by pinching the edges of the dough in towards the middle.

Place seam side-down on a baking sheet lined with parchment paper. Cover with a tea towel and proof at room temperature for 3 – 4 hours, until puffy. You should be able to poke the dough with your finger and have the indent remain. Or, you can let the buns proof overnight in the fridge or somewhere else cool (like your cold garage) – cover them lightly with plastic wrap over the tea towel (or put the tray in a large plastic bag) to prevent them from drying out, and then let them sit somewhere warm for a few hours before baking the next day.

When you’re ready to bake, preheat the oven to 350˚F. Mix together the cross paste for the top of the buns:

scant 1/2 cup flour

1 tbsp vegetable oil

pinch of salt

1/4 cup water

Mix with a fork to make a pipeable paste – you might need a few extra drops of water. Spoon the paste into a piping bag (disposable is very convenient here) or Ziplock baggie and snip off the tip. With a steady hand, pipe crosses on the buns. Bake in the preheated 350˚F oven for 25 – 35 minutes, until golden brown on top.

While the buns are baking, mix together a glaze of:

1 tbsp granulated white sugar

1 tbsp boiling water

Stir until the sugar is dissolved, then brush over the baked buns as soon as they come out of the oven to give them a glossy, sticky top. Let the buns cool slightly on a rack. These are wonderful warm from the oven, but they are also equally good toasted and smeared with butter and jam.

This post has been YeastSpotted! And also submitted to Panissimo, a showcase of breads hosted by Barbara and Sandra.


Ciabatta Bread

0
0

Ciabatta BreadOh how I’ve missed baking bread every week!

This beautiful, holey, airy, chewy bread is exactly what homemade bread should be: rustic and delicious and better than anything you can buy in the store, partly because it only contains five ingredients (flour, water, yeast, salt, and olive oil) but mostly because you made it yourself. That’s the part about baking bread that I love the best.

Ciabatta means “slipper” in Italian, and this bread is called that because apparently it looks like a worn-out old house slipper – ie: flat and kind of shapeless. It is made from a super high hydration dough, which gives it all those characteristic lovely bubbles and holes in the interior, but which also makes it hard to shape into anything other than a blob. But no worries – what it lacks in conventional good looks it more than makes up for in deliciousness, and when you cut into the wrinkled brown crust to reveal the creamy white, almost lacy interior, well… that, my friends, is beauty.

The typical ciabatta has a low rounded cross-section, a custardy interior crumb riddled with large holes, a thin-crispy-chewy crust, and a wrinkled-looking exterior from being coated in flour before baking. My loaves are lacking a few wrinkles – next time, more flour on the outside – but other than they are pretty much exactly what I was hoping for. The recipe couldn’t be much easier – you don’t even have to knead the dough, which instead employs the good old stretch-and-fold method combined with a long rest in the fridge to develop flavour and stretchy gluten strands.

This is the kind of bread you want to eat on its own, with maybe a smear of butter, just to enjoy the magic that happens when flour, water, and yeast combine. Sorry to wax all poetic here, but damn – bread is awesome, this one in particular.

Ciabatta Bread

From the “Pain à l’Ancienne” recipe in Peter Reinhart’s Artisan Breads Everyday. Makes 2 large loaves.

Up to four days before you want to bake the ciabatta, mix the dough. In a large bowl, combine:

4 1/2 cups bread flour

2 1/2 tsp coarse kosher salt

1 1/4 tsp instant yeast

In a measuring cup, mix together:

2 cups cold water

1 tbsp olive oil

Add the water/oil to the flour mixture and stir with a wooden spoon for a minute, until it is all evenly moistened and sticky. It will be quite wet, almost more of a batter than a dough.

Cover the bowl with plastic and let it rest for 10 minutes. While the dough rests, lightly rub your work surface with a thin coat of olive oil – this will help keep the wet dough from sticking.

After 10 minutes, scrape the dough out onto the oiled surface – you should almost be able to pour the dough out of the bowl. Wash the bowl out and oil it lightly with more olive oil. Wet your hands (this will prevent them from sticking to the dough) and grab the dough on one side from underneath, stretching it up and then folding it over on itself. Repeat this stretching and folding in all four directions, then scrape the dough up and put it back into the now-oiled bowl. Cover with plastic and rest 10 minutes.

Repeat every 10 minutes three more times, for a total of four stretch-and-folds over 40 minutes. With each consecutive series of stretches and folds, the dough will become less of a sticky mess and more cohesive, elastic, and manageable. Keeping your hands wet when handling it will make it much easier.

After 40 minutes, place the covered dough in the fridge to ferment at least overnight and for up to 4 days. It will rise in the fridge, perhaps up to double its original size.

Remove the dough from the fridge 3 hours before you want to bake. If it hasn’t risen to 1 1/2 times its original size, give it an extra hour at room temperature to rise a bit more.

After an hour (or more as necessary), line the back of a baking sheet with parchment paper and dust it liberally with flour. Flour your work surface heavily as well.

With wet hands, very carefully scrape the dough out of the bowl into the floured work surface, being careful not to deflate it. It should be full of bubbles and feel almost bouncy. Still with wet hands, gently shape the dough into a rectangle, reaching underneath the dough with your fingers to stretch it as necessary. With a large knife (wet the blade), cut it in half. Gently fold each half into thirds, like a letter, and equally gently, roll the dough in flour to coat it.

Transfer each blob of dough to the floured parchment paper, placing it seam-side down. Mist with spray oil and cover loosely with plastic wrap. Let it rest for 1 hour.

After an hour, transfer the dough back to your floured work surface, seam-side down to once again coat it in flour, then flip it over seam-side up. With your hands underneath the dough, gently stretch it into a rectangle and place it back on the parchment paper, seam-side up this time. Make sure the top surface is well-coated with flour to ensure that floury, wrinkled exterior. Cover gently with plastic and let the dough proof for one final hour.

Forty minutes before the hour is up, preheat the oven to 550˚F (or its highest temperature) with a rack and baking stone (if you have one large enough) in the middle position and a metal roasting pan on a lower rack. When the dough is finished proofing, place it in the oven with the parchment paper, either on the upside-down baking sheet or directly on the baking stone (mine wasn’t big enough for both loaves). Pour a mugful of hot tap water into the roasting pan, close the door, and turn the oven temperature down to 450˚F. Bake for 12 minutes, then rotate the loaves and bake 15-20 minutes more, until the bread is well browned and hollow-sounding when tapped.

Cool on a rack for at least 45 minutes before slicing (the waiting is torture!).

This post has been YeastSpotted, and submitted to Panissimo hosted by Barbara and Sandra.


Light Brioche Hamburger Buns

0
0

Light Brioche Hamburger Buns | Korena in the KitchenSummer is almost here, I can feel it. The first half of May was a big tease, followed by nothing but cold and rainy disappointment, but I have high hopes for June. So far it’s been pretty nice and we’re been doing a lot of barbecuing to take advantage of the warm evenings. Which brings me to probably the most well-known item of the summer barbeque: the hamburger. Many people go to great lengths to doctor up the beef patty, but in this case, I decided to focus my energy on the bun instead. It was a good idea!

This is the light brioche bun from The New York Times’ feature on the perfect burger. I used honey in place of the sugar, reduced the amount of yeast, gave the dough a long, cool ferment overnight in the fridge, and was rewarded with flavourful, fluffy, slightly chewy buns that soaked up all those good burger juices without falling apart. They also made an excellent vehicle for pulled pork the next day.

Giving a recipe for a burger is kind of like giving a recipe for a pizza: everyone already knows how it goes together, pretty much. Instead, here are some tips I followed for making and cooking the burger patties, which can basically be translated as KISS (keep it simple, stupid).

First, for a tender burger, handle the ground beef as little as possible, because the more you mix and squeeze the beef, the tougher the cooked burger will be. Just gently pat the ground beef into patties (these ones were about 1/3 lb each, which was a lot of burger – 1/4 lb each would be plenty) and season the outside of each with a generous amount of salt and pepper just before cooking. If you’re using good quality beef, you shouldn’t need any more seasoning than that in the patty. When you shape the patties, use your thumb to make a little indent in the middle of each – this will prevent the burgers from puffing up in the middle and will reduce the temptation to smash them down flat with your spatula as they cook, which just squishes out all the juices.

Second, you want to cook the patties at a high enough heat to get a nice crust on the outside, and then finish them either over indirect heat or in the oven. This allows you to achieve that delicious caramelization on the outside of the patty without overcooking the rest of the burger – no amount of toppings can fix a disappointing, dry, overcooked burger.

I cooked my burgers on the barbeque over medium-high heat on both sides, then moved them onto the upper warming rack to finish cooking, topped with a disc of grated cheddar cheese that melted into a gooey puddle.

Third, if you’ve gone to the trouble of making your own hamburger buns, you’ve got to toast them. Cut them in half and pop them on the grill, cut-side down, until they have grill marks.

Then it’s up to you to layer them with all the toppings you desire (in this case, bacon, avocado, lettuce, tomato, pickle, mayo, mustard, and ketchup).

Light Brioche Hamburger Buns

Adapted from The New York Times. Makes 8 buns.

In a glass measuring cup, combine:

1 cup warm water

3 tbsp milk

3/4 tsp active dry yeast

1 1/2 tbsp honey

Mix and let sit until the yeast is frothy, about 5 minutes.

In a large bowl, combine:

3 cups bread flour

1/3 cup all purpose flour

1 1/2 tsp salt

Add 2 1/2 tbsp softened unsalted butter and rub it into the flour with your fingertips until it makes small crumbs.

Add:

the frothy yeast mixture

1 beaten egg

Stir with a wooden spoon until a shaggy dough forms.

Scrape the dough out onto an unfloured surface and perform the slap and fold kneading technique until you get a smooth, elastic dough that cleans the surface you are kneading it on, about 8 to 10 minutes. (This is a good stress reliever, and will probably cause your significant other to wonder what the heck you are doing to make so much noise.) Shape the dough into a ball, place it in a bowl, and cover it tightly with plastic. Place in the fridge to rise overnight, until doubled in size.

The next morning, let the dough sit at room temperature for 30 – 40 minutes. Turn it out onto a lightly floured surface, divide it into 8 pieces, and shape each into a tight ball. I found it easiest to roll each piece in a very light dusting of flour and then pinch the edges into the middle to form a ball.

Place the buns on a silicone mat or parchment paper-lined baking tray and cover with a kitchen towel. Let the buns rise in a warm place for 1 – 2 hours, until large and puffy. You should be able to poke them gently and have the indent remain.

Preheat the oven to 400˚F with a rack in the middle of the oven and a roasting tray on a lower rack. Make an egg wash by whisking together 1 egg and 1 tbsp water and brush it over the risen buns. Sprinkle them with sesame seeds, if desired. Place them in the oven on the middle rack, and pour a mug of hot tap water into the roasting pan. Bake for about 15 minutes, turning the baking tray halfway through the baking time, until the buns are golden brown and shiny. Remove to a rack to cool completely before splitting, toasting, topping, and devouring.

This post submitted to YeastSpotting and to Barbara and Sandra at Panissimo.


My Favorite Skillet Cornbread

0
0

Skillet Cornbread | Korena in the KitchenThis is the only cornbread I’ve ever made, but it’s so awesome I’ve never felt the need to try another recipe, so it automatically gets the “favorite” label. Plus it’s made in a cast iron skillet, which is my favorite pan.

I made this to eat with baked beans, but it’s equally good on its own, or slathered with butter and jam. This recipe yields quite a lot, but stays moist for a few days and and is delicious toasted, so leftovers always make me happy.

Once summer kicks in and local corn starts showing up, this will be a great way to use it. But in the meantime, frozen corn works just fine. If you wanted to get fancy, you could jazz it up with a handful of grated cheddar and some chopped green onions, or perhaps even some blueberries for a sort of blueberry-cornmeal skillet bread. Oooh, I like the sound of that…

Skillet Cornbread

Adapted from The Cast Iron Skillet Cookbook

Preheat the oven to 400˚F. Generously butter the bottom and sides of a 10-inch cast iron skillet and place it in the preheating oven.

In a large bowl, combine:

1 cup cornmeal (coarse or finely ground, your choice)

1/2 cup all purpose flour

1/2 cup whole wheat or whole spelt flour

1 1/2 tsp baking powder

1/2 tsp baking soda

1/2 tsp salt

In a medium bowl, mix together:

2 large eggs

1/2 cup sour cream or plain yogurt

1 cup milk

4 tbsp melted butter

2 tbsp maple syrup or honey

Make a well in the center of the cornmeal mixture and pour in the egg mixture. Give a few stirs, then add 2/3 cup fresh or frozen (thawed) corn kernels. Stir until just combined – there should still be a few streaks of flour.

Pour the batter into the heated skillet and place it back in the oven. Bake for 10 minutes, then drizzle the partly-baked cornbread with another 2 tbsp melted butter.

Returns to the oven and bake for another 10 minutes or so, until browned on top and a toothpick inserted in the middle comes out clean. Cool for about 15 minutes before cutting into wedges.


Twisted Baguettes à l’Ancienne

0
0

Baguettes have been on my to-do list for a long time, but the traditional shaping process has somewhat intimidated me. However after seeing Yvonne’s beautiful, airy baguettes that she shaped by stretching and twisting the dough, I realized that it doesn’t have to be intimidating.

I made these for the girls’ weekend on Salt Spring to go along with our five kinds of goat cheese (I told you, we weren’t messing around). They are made from Peter Reinhart’s pain à l’ancienne bread dough – the same wonderful, flavourful, high hydration dough that I used for ciabatta, minus the olive oil – and as such, they were really good: lots of air holes and fermented flavour.

My oven was acting up (again!) when I made these, so they didn’t get as dark brown all over as I’d hoped, but I thought they looked really pretty with the flour-dusted twisted crust. I transported the baguettes to said girls’ weekend in a plastic bag so unfortunately the once-crisp crust had softened by the time we ate them, but regardless they were delicious. Non-twisted baguettes are still on my to-do list, but in the meantime, these will do fine :)

Twisted Baguettes à l’Ancienne

Inspired by Bitter Baker, dough from Peter Reinhart’s Artisan Breads Everyday. Makes 4 baguettes.

Follow the recipe for this dough but omit the olive oil. Mix, fold, and ferment the dough in the fridge for up to 4 days as directed in the recipe.

When you are ready to bake, let the chilled, fermented dough sit at room temperature for about an hour. After that hour, preheat the oven to 550˚F (or its highest temperature) with a rack and baking stone (if you have one large enough) in the middle position and a metal roasting pan on a lower rack. Line 2 baking sheets with parchment paper and sprinkle them with flour (if you have a baking stone large enough to accommodate the baguettes, put the parchment paper on upside down baking sheets – this will allow you to easily slide the parchment paper directly onto the stone).

Generously flour your work surface and scrape the dough out of the bowl onto the floured surface, being careful not to deflate it. Gently stretch the dough into a square, then use a large knife to cut it into 4 equal pieces.

Stretch and fold each piece in thirds like a letter, then roll the pieces in flour and let them rest for about 10 minutes.

Stretch each piece of dough until it is as long as will fit on your baking sheet – do this by picking up the dough from one end and letting it hang and stretch under its own weight, allowing it to rest for a few minutes if it shrinks back.

When it is the correct length, twist the dough from each end and transfer it to the prepared baking sheets. If it comes untwisted, let it rest again to relax, then give it a few more twists.

The baguettes can be baked as soon as the oven comes up to temperature (they don’t need to proof but will be fine sitting out while the oven finishes preheating). Place them in the 550˚F oven one baking sheet at a time (or slide the parchment paper directly onto the baking stone) and pour a mug of hit water into the roasting pan on the lower rack to create steam.

terribly blurry picture, sorry!

Reduce the oven temperature to 475˚F and bake for 15 – 20 minutes, until dark brown all over. Repeat with the remaining baguettes, letting the oven temperature come back up to 550˚F first. Allow the baguettes to cool completely on a rack before slicing.

Submitted to YeastSpotting and Panissimo, a monthly showcase of bread created by Barbara and Sandra, hosted this month by Barbara.


Colossal Sourdough Cinnamon Buns

0
0

You know those absolutely huge cinnamon buns – the ones the size of your face – that you find at hotbeds of food culture like the mall food court? These are like those in size only – they taste a million times better (that’s a mathematical fact, I can assure you).

These cinnamon buns are indeed colossal in size, but they are also fairly colossal in flavour – but then, they should be, seeing as they take about three days to make! As with any sourdough recipe, they require a good amount of time, but most of it is just letting the dough hang out and do its thing, which means you can go off and do your thing, too. If you do a little bit of planning before starting these, you can easily have them fresh out of the oven for breakfast one morning, however I am guilty of not always planning my baking exploits very well so it didn’t work out that way for me – but I can now tell you on good authority that the dough is pretty forgiving and you can throw it in the fridge to wait for you if its schedule doesn’t mesh with yours.

So what’s so special about these buns, other than the fact they they are huge and take forever? Well, for one, they have a very intriguing secret ingredient: mashed potatoes. This helps make the dough extra light and soft. The enriched dough is also made in a totally unique way: rather than mixing the butter into the already-formed dough, which is the normal brioche method, the butter is first creamed with sugar, eggs, and milk, and then the starter and flour are added. Weird but it works! You end up with an incredibly sticky, soft dough – almost more of a batter, really – but it makes for some amazingly tender and voluminous buns.

The dough is sweetly vanilla-scented with all the complex flavours of a long fermentation process, the cinnamon-sugar filling melts into caramel-y puddles beneath each bun, and the cream cheese frosting… well, putting it on a warm cinnamon bun is a dangerous, dangerous thing. I dove into this bun with both hands (a fork would have been a better idea), licking my fingers with abandon and barely pausing long enough from stuffing my face to wipe off one hand to take a picture. Yup, they’re GOOD.

This is a Sourdough Surprises project, and boy am I glad the ladies in charge picked this recipe! Lengthy but worth it, I’d say :) Check out the link below for all the other delicious sourdough cinnamon (and other!) buns made this month.

Colossal Sourdough Cinnamon Buns

Adapted from Not So Humble Pie and Mountaindog @ The Fresh Loaf. Makes 8 giant buns, which is from only half the original recipe yielding 12 buns (I can only imagine how big those ones must have been!!) The ideal schedule for these buns is mix the levain in the evening of Day 1, make the final dough the morning of Day 2, let it rise all day, fill and shape the rolls in the evening, let them proof overnight in the fridge, then bake in the morning of Day 3. Or something like that!

Levain

In a large bowl, mix together:

75 grams 100% hydration mature, active starter

170 grams water

170 grams all purpose flour

Mix the water into the starter first, followed by the flour. Cover and let ferment overnight.

Final Dough

The next morning, cream in the bowl of an electric mixer with the paddle attachment:

57 grams unsalted butter, soft

When the butter is light and fluffy, add:

1 egg + 1 egg yolk

21 grams honey

12 grams (1 tbsp) vanilla

65 grams mashed potato (just straight mashed potato – no butter or cream added, about 1 small potato’s worth)

Continue creaming the mixture, scraping down the sides of the bowl, until well blended (don’t worry if it looks curdled).

Switch the paddle attachment for the dough hook and add:

97 grams milk

425 grams levain (you will have a little bit of levain leftover – just throw it back in with your starter)

Mix until well blended – the butter might curdle badly at first, but it will be OK. Just keep mixing and eventually it will come together in a lumpy-looking batter.

Mix together:

350 grams all purpose flour

10 grams salt

With the mixer on medium-low, gradually add the flour to the levain mixture. Mix until well-blended, scraping down the bottom and sides of the bowl a few times. The dough will be very soft and sticky. Cover the bowl and let it rest for about 20 minutes.

After 20 minutes, mix again for 2 – 3 minutes, until the dough is silky smooth but still very wet and sticky (resist the temptation to add more flour!)

Scrape the (incredibly wet and sticky) dough into a large buttered bowl, cover it, and let it rise somewhere cool (like the fridge) until doubled (8 – 12 hours, depending on the temperature). Give the dough a stretch and fold every 4 hours. The dough is much easier to handle and roll out when chilled, so if you haven’t been rising it in the fridge, I would suggest putting it in there for at least an hour at the end of its rise.

Towards the end of the rise, prepare the filling.

Filling

In a small bowl, mix together:

85 grams melted unsalted butter

43 grams heavy cream

6 grams (1 1/2 tsp) vanilla

In another bowl, combine:

225 grams brown sugar

3 grams (1 1/2 tsp) cinnamon

a pinch of freshly grated nutmeg

a pinch of salt

Set both bowls aside while you roll out the dough.

Once the dough has risen double, prepare a couche for rolling it out. If you don’t have a real baker’s couche, you can use a woven, fuzz-less cotton or linen tea towel. Sprinkle it VERY generously with flour and rub it into the cloth with your hand. Don’t skimp on the flour, otherwise the dough WILL stick and it will be not very fun.

Turn the dough out onto the floured couche, sprinkle it with more flour, and stretch it into a rectangular shape. Use a floured rolling pin to even it out into a 9″ x 18″ rectangle.

Drizzle the butter-cream mixture over the dough and spread it out, right to the edges, with the back of a spoon. Sprinkle the brown sugar mixture evenly over top and spread it out in a similar fashion. Roll the dough up into a cylinder from one long end, using the couche to help with the rolling. Use a piece of thread or (non-minty) dental floss to cut the cylinder into 8 rolls. As you cut each one, transfer it to a buttered 9″ x 13″ baking pan.

Cover with plastic and let rise in the fridge until doubled (overnight) – or, if you’re impatient like I am, in a warm place for a few hours.

Bake the rolls in a preheated 400˚F oven for 25 – 35 minutes, until they are 195˚ – 200˚F in the middle. Make the cream cheese frosting while the rolls cool in the pan. (You can brush them with a little melted butter to keep them soft, but I skipped this and they were fine.)

Cream Cheese Frosting

Adapted from Not So Humble Pie.

In the bowl of an electric mixer fitted with the whisk attachment, beat until smooth and light:

8 oz cream cheese

3/4 cup powdered sugar

1/2 tsp vanilla

Scrape into another bowl and clean off the whisk. Pour 1/2 cup of heavy cream into the mixer bowl and beat just until stiff peaks form. Add in the cream cheese mixture and beat quickly to combine (don’t over-mix). It should be quite light and fluffy, however I used cheap cream cheese so mine never thickened up very well. But it still tasted awesome!

Slather an embarrassingly large spoonful of the frosting on a still-warm cinnamon roll and dig in. You’re welcome.

Store any leftover rolls unfrosted, covered in plastic wrap, at room temperature, for up to 2 days.

*     *     *

This post has been YeastSpotted and submitted to Panissimo, the bready brainchild of Barbara and Sandra, hosted this month by Sandra herself.


Daring Bakers: Doughnuts {Choose Your Own Challenge}

0
0

In a “celebration” of past Daring Baker and Daring Cook challenges, Lisa challenged all of us to search through the Daring Kitchen archives and pick any one we’d like! The REAL challenge was picking which delicious recipe(s) to try!

You hear that? The “REAL” challenge? Was it ever! For someone who becomes paralyzed with indecision when faced with life-altering choices such as which flavours to use in a cake (yeah, I’m that cool), the most challenging part about this month’s challenge was most definitely just choosing what to do. I was thinking croquembouche at first, or perhaps éclairs, or maybe something with ice cream, but eventually I decided on yeasted doughnuts. This was a decision fraught with anxiety though, let me tell you: I desperately wanted to make them (they’re on the list!) but I figured that deep-frying in the middle of July was kind of a silly move, and being that one batch of doughnuts makes over two dozen, I knew that I would have at least twenty-three more doughnuts than would ever be necessary. But I went ahead with it anyway ;)

As I started mixing the dough, I told myself, “Just make half a batch.” But I didn’t listen. I made a full batch of dough, and then as I was cutting out the doughnuts, I told myself, “Freeze half for later.” But again, I didn’t listen, and then I interrupted myself with a mad dash to the corner store for vegetable oil after I realized that the 3 liter container in the cupboard was actually mostly empty. As I was frying my twentieth doughnut and the golden brown rings were starting to pile up around me, I accepted the fact that I was going to end up with a boatload of doughnuts and my line of thought changed to, “Who the heck am I going to give all of these to?!”

When I bit into a warm cinnamon-sugar covered doughnut hole (just like a mini-doughnut at the fair!), I briefly considered eating all twenty-seven doughnuts myself…

…but then my sanity (or whatever shreds remained after deciding to embark on this journey) returned and I ended up giving some to Nate’s family and some to my friend Aaron (whose wife is probably still mad at me. ;) ) Nate, bless him, only uttered a few incredulous “Oh my god!”s when he walked in on me in full doughnut production, and when I confessed that this was probably the most ridiculous thing I’d ever made, he assured me that, “No it isn’t! You made a bacon caramel cake!” That’s why I love him ;)

But these doughnuts? Totally worth it. They were light, airy, and slightly chewy on the inside, not at all greasy on the outside, and they tasted amazing. The fresh nutmeg in the dough is what does it – it doesn’t make them taste like nutmeg, but rather exactly the way the best yeasted doughnut should taste. Frying them wasn’t a hassle, either – just keep an eye on the temperature of the oil, which should be at 365˚F for optimal, non-greasy results. Frying the doughnut holes, on the other hand, was a giant pain – they were so full of air that they didn’t want to stay flipped over, so it was really hard to get them evenly browned all over. In hindsight, I would probably skip them altogether for their annoying-ness factor (even though it was kind of fun to have homemade Timbits!)

So will I make doughnuts again? Yes, definitely – but probably only half a batch, and definitely only when I have a crowd to feed ;) Thanks to Lisa for the opportunity to take on a past challenge, and check out the Daring Kitchen for a slideshow of what everyone else made this month!

Yeasted Doughnuts

From the Daring Bakers October 2010 challenge – adapted slightly from Alton Brown’s recipe (here’s a great video of him making these doughnuts on Good Eats). Makes just over 2 dozen doughnuts, plus doughnut holes, if you have enough patience for them ;) I would HIGHLY recommend making only half a batch unless you are feeding, like, 25 people.

Dough

In the bowl of an electric stand mixer, mix together:

1/3 cup warm water

4 1/2 tsp active dry yeast

Leave for about 5 minutes, until thick and foamy.

Meanwhile, mix together:

1 1/2 cups warm milk

1/3 cup butter, cubed

Set aside, stirring occasionally, until the butter is melted, then pour into the foamy yeast mixture. Stir with the paddle attachment to combine.

Measure out 23 oz (4 2/3 cups) all purpose flour. Add half the flour to the mixer bowl, along with:

2 large eggs, beaten

1/4 cup granulated white sugar

1 1/2 tsp salt

1 tsp freshly ground nutmeg (I used a bit less than this and wish I’d used the full amount)

Stir on low speed to prevent the flour from flying all over your kitchen, then increase to medium speed and mix until you have a smooth-ish, liquidy batter. Add the remaining flour and mix again until you have a sticky, well-combined dough. Swap the paddle for the dough hook and knead on medium speed for a few minutes, until the dough pulls away from the sides of the bowl (it will be sticky and that is good, but I had to add a few spoonfuls of flour at this point). Scrape the dough into an oiled bowl, cover it with plastic, and set aside to rise until doubled (about an hour).

Gently turn out the dough onto a floured surface and pat it flat with your hand. Fold it in half, then in quarters. Pat it flat again and repeat, then tuck all the edges underneath and shape it into a neat round. This will redistribute the yeast in the dough and make the doughnuts rise nice and evenly. Cover it with an upturned bowl and let the dough rest for about 30 minutes.

Once it has rested, roll the dough out to just under half an inch thick (3/8 of an inch). Use a doughnut cutter to cut rings of dough, or you can use any 2 1/2″ circular cutter plus the bottom of a large piping tip to cut out the holes (ideally about 1″ in diameter). (For jam-filled doughnuts, skip the hole.) Lay the cut doughnuts and doughnut holes on a floured baking sheet, about an inch apart to give them room to expand without touching (or they will stick together).

Cover with a tea towel and proof for about 30 minutes, until puffy.

Meanwhile, heat 3 inches of vegetable oil (for me, this was close to 3 liters) in a large, heavy Dutch oven over medium/medium-low heat until it reaches 365˚F (a candy/deep fry thermometer is really important here). Set a cooling rack upside down on top of some paper towels on a baking sheet – this will allow the doughnuts to drain without becoming soggy.

One at a time, gently place the doughnuts in the hot oil, waiting a few seconds after each doughnut, and cook on both sides until deeply golden brown (1 – 2 minutes per side). Remove to the cooling rack. Because the dough is quite sticky, I found it easiest to place the doughnuts in the oil with my hands (very carefully), and the best tool for flipping and removing the doughnuts was the handle of a wooden spoon. Repeat with the doughnut holes, if you are so inclined. Let the doughnuts cool for about 15 minutes before glazing/filling/rolling in sugar.

Glazing/Filling/Rolling

Each glaze variation given will make enough for an entire batch of doughnuts. I made one batch of plain glaze, poured half of it into a bowl and added the honey, then made the rest into half a batch of chocolate glaze.

For Plain Glaze, combine over low heat in a saucepan until warm:

1/4 cup milk

1 tsp vanilla

Sift 2 cups icing sugar and add to the warm milk, stirring slowly and gently with a whisk until smooth (you don’t want to be too vigorous or you’ll get too much air in the glaze, which will make it harden and fall off the doughnut when you bite into it). Dip the top of each doughnut into the glaze while it is still warm, and then place the doughnut on a tray to let the glaze set.

For Honey-Vanilla Glaze, stir 1 1/2 tbsp honey into the Plain Glaze.

For Chocolate Glaze, with the saucepan still over low heat, add to the Plain Glaze:

1/2 cup unsalted butter, cubed

1 additional tsp vanilla

1 tbsp corn syrup

pinch salt

Once the butter is melted, stir in:

4 oz bittersweet chocolate, chopped

Stir gently just until melted, then dip the doughnuts as described above. If desired, decorate with sprinkles or candies before the glaze sets.

For Jam-Filled Doughnuts, do not cut a hole in the middle of the doughnut. Fry as above. Once cooled, poke a paring knife into the side of the doughnut to make a little pocket. Fill a piping bag with jam, poke the tip into the cut you made, and pipe the jam into the doughnut. Dust the tops of the doughnuts with icing sugar.

For Cinnamon-Sugar Doughnuts, mix together granulated white sugar and a big pinch of cinnamon (just eyeball it!) in a bowl. Gently press the doughnuts into the sugar mixture on both sides.

The doughnuts are best eaten the day they are made – they don’t keep very well, hence my big worry about who would eat them all!


Apricot Oat Bread

0
0

IMG_4972Once upon a time, my good friend and fellow tea partier Lynette was also my roommate. Being a tidy sort, one of her cardinal housekeeping rules was Everything Shall Have Its Own Place in The Fridge. This comes to mind frequently when surveying the inside of my own over-stuffed, disorganized and messy fridge, so last week I finally did something about it. During the subsequent clearing-out and re-organizing, I discovered two things: 1) I have neglected my poor sourdough starter at the back of the fridge for too long (luckily, nothing a good feeding couldn’t fix), and 2) I have a very large collection of half-empty jars of jam. These two things added up to one obvious solution: time to bake bread!

I borrowed Richard Bertinet’s book “Dough” from Nate’s mum several months ago and took this as a chance to actually make something out of it. The recipes use conventional yeast, and I planned on adapting one to use my sourdough starter, but I got too impatient waiting for it to revive fully for baking and ended up using regular yeast (but I did mix up some starter so I can try a recipe with sourdough). The recipes and techniques in the book are all very approachable for the home baker – seasoned bread nerd or not – and most of them are variations on several master recipes, with extra ingredients added in or special shaping techniques used. Rather than the long, slow fermentation and minimal kneading that is used in many current artisanal bread recipes, Richard employs a wonderful slap-and-fold kneading technique (which I’ve used before) to develop the gluten and create a flavourful, airy bread in a relatively short amount of time. A DVD showing Richard mixing, kneading, and shaping the dough is included with the book – I never get tired of watching the skill with which a master baker handles dough!

I chose this apricot and oat bread with a whole wheat base because it sounded good and breakfasty, like it would be a nice platform for jam. It is, but it’s also pretty wonderful with cheese or on its own with a smear of butter. It’s a bit dense so thin slices are best, and it makes great toast. I haven’t been baking bread regularly for a few months now – it was becoming too easy to eat nothing but bread all the time – and this loaf reminded me that I love doing it. I’ve said it before, but bread is kind of magical – and not just because it keeps the jam population of my fridge in check. ;)

PS – I decided to break new ground and make a video of the kneading technique used in this recipe – the sound is kind of terrible (I don’t actually have a lisp) and please excuse the messy counter in the background, but you can see my film debut below. :)

Sourdough Apricot Oat Bread

Adapted from Dough by Richard Bertinet. Makes 2 loaves.

In a large bowl, mix together:

10 1/2 oz whole wheat flour

7 oz white bread flour

1/4 oz (1 1/2 tsp) instant yeast (or 1/3 oz fresh yeast)

Once the yeast is mixed into the flour, add:

1 tbsp fine-grain salt (adding the salt and yeast separately minimizes the chance for the salt to kill the yeast)

Then stir in:

12 1/2 oz room temperature water

Mix until the dough starts to form, about 2 – 3 minutes. It will be very soft and sticky but don’t add any more flour.

Scrape the dough out onto an unfloured surface and begin Richard’s slap-and-fold kneading technique: reach underneath the dough with your fingers (palms facing up), lift it up, then flip it over and slap it back down onto the counter by quickly turning your hands over so they are facing palm down. Drag/stretch the dough up towards you, then fold it back over onto itself, trapping air underneath it, and tuck the edges in, which brings you back to your starting point. Repeat, trying to stretch the dough and trap as much air in it as possible. Continue this until the dough starts to become smooth, elastic, and easy to handle – it is quite remarkable when a sloppy mass of flour and water turns into such a responsive dough literally beneath your hands! I found this dough a bit firmer than others I’ve used this technique with, and it only took about 5 – 8 minutes of kneading.

Flatten out the dough and add 7 oz chopped dried apricots into the center. Fold over the dough to seal in the apricots, then continue with the slap-and-fold kneading (you’ll have to be rather careful at first) until they are evenly distributed through the dough and it no longer sticks to the counter.

Tuck the sides of the dough underneath to form a round ball and place the dough in a bowl. Richard tells you to sprinkle a little flour over the top of the dough but I found it actually caused the dough to try out a bit on the outside, so I would suggest skipping the flour or brushing it with a little bit of water to keep it moist instead. Cover the bowl with plastic, and let it sit somewhere warm until doubled in size – an hour or more, depending on temperature. (This rise took a really long time for me because I used active dry yeast instead of instant – silly girl!)

Gently turn the risen dough out of the bowl onto a floured surface. With a bench scraper, divide the dough in two pieces and form each into a ball by tucking the edges underneath. Cover with a towel and let rest for 10 minutes.

To form the loaves, flatten each ball into a circle. Fold one edge in to the middle and press with your fingertip or the heel of your hand to seal. Tuck the opposite edge in to the middle and press to seal. Now fold the dough in half along the seam you just made, and use the heel of your hand to secure it. Turn it so the seam is on the bottom. You should have a torpedo-shaped loaf about 6-inches long.

Place 3 oz rolled oats on a plate. Brush each loaf with a little bit of water then roll them in the oats, pressing the oats to adhere. Place the loaves on a baking sheet and with a sharp knife or razor blade, cut a few deep slashes on top of each loaf. I use a homemade lame, which is a razor blade stuck on the end of a disposable wooden chopstick (which I whittled down to fit into the razor blade). Cover the loaves lightly with plastic wrap and set aside to proof until almost doubled in size (about 1 hour). While the loaves proof, preheat the oven to 475˚F with a rack in the middle and a metal roasting pan on a lower rack.

Place the proofed loaves in the preheated 475˚F oven and pour a mugful of hot tap water into the metal roasting pan to create steam. Turn the oven temperature down to 425˚F and bake the loaves for 25 – 35 minutes, until well-browned and hollow-sounding when tapped on the bottom. Cool completely on a rack before slicing.

This post submitted to YeastSpotting and Panissimo, created by Barbara and Sandra and hosted this month by Barbara.


Attempted Baguettes

0
0

IMG_5316Oh, hi. I’ve been kind of absent in these parts this week – I’m back at work full-time (did I mention I had four months off over the summer? Yeah, tough life!) and being out of the house for almost 10 hours a day while still trying to indulge in my blogging habit is taking some getting used to (I know, I know, suck it up Korena!). I just haven’t found the time or energy to finish a post, even though I have a backlog of recipes waiting to be posted. Oh well. First world problems, right?

Anyway, onto the topic of this post: the baguette. A seemingly simple cylinder of dough, tapered at both ends, baked to a shatteringly crisp, crusty perfection. However, having the inquiring mind that I do, I researched the heck out of just how to create said seemingly simple cylinder, and in the process, psyched myself out a bit (kind of like I did with macarons, another French creation). It wasn’t until I came across Richard Bertinet’s shaping instructions that I felt comfortable enough to try it out, and thankfully, it was actually much easier than I imagined.

I made these with the white dough from Richard’s book, again using the slap-and-fold kneading technique (I made another video showing how the dough looks/behaves before and after kneading – see below!). The bread was nice, but my oven was having a terrible, horrible, no good, very bad day and did NOT want to hold a temperature above 375˚F, which is not conducive to that shatteringly crisp, crusty perfection I mentioned earlier. Instead, the crust ended up very pale on the bottom and kind of chewy overall, but I attribute this completely to equipment failure rather than to the recipe.

Brown on top, pale on the bottom. Silly oven, that’s not how it’s supposed to be!

That said, I think I do prefer the “no knead” recipes that employ a few folds to develop gluten and a longer rest time to develop flavour. I made another, much more successful attempt at baguettes using a modified version of my go-to everyday bread, and they turned out fantastically: the oven cooperated, the crust was shatteringly crisp, the slashes opened up nicely, and the taste was amazing. I’ll be making these again for sure, so stay tuned.

These ones came out perfectly though.

For this first attempt, I made a couple of the baguettes into epis, or stalks of wheat. This is a really easy technique – even easier than slashing a straight baguette – and looks pretty impressive. It’s perfect for serving at a dinner party (which is what I did) because the “kernels of wheat” can be broken off individually and no one has to worry about their dining companions wielding a bread knife in close quarters.

Oh yes, and remember I mentioned that I wanted to experiment with converting Richard’s recipe to sourdough? This was the result:

Looks pretty, but wasn’t very successful – another oven fail, combined with the fact that I got impatient (impatience and sourdough don’t mix, FYI) and didn’t give my starter enough chance to wake up from its hibernation in the fridge before baking with it, which meant that it didn’t rise very much at all, didn’t brown properly in the oven and instead got super hard and chewy, and tasted reeeeeeeeaaaaally sour. Unfortunately I gifted some of it to my neighbour before realizing this, but I’m hoping that the apricot oat bread that went along with it made up for it! ;) This was another fun shape though: fougasse, which is slashed to create holes in the bread to suggest the shape of a leaf or stalk of wheat (again!). Moral of the story? Sometimes following a recipe is the right thing to do…

White Baguettes

From Richard Bertinet’s Dough. Here is the video of Richard that comes with the book, showing how to mix and handle the dough. Makes 4 baguettes. 

In a large bowl, mix together:

18 oz white bread flour

1 1/2 tsp active dry yeast

Stir in:

2 tsp fine grain salt

12 1/2 oz water (not fluid oz)

Mix until the dough comes together – you might need to add a few tablespoons more water to get all the flour moistened and incorporated.

Turn the dough out onto an unfloured surface and begin the slap-and-fold kneading technique, kneading until the dough is smooth, sticky but not sticking to everything, and very elastic. This video shows what it looks like at the start vs. the final product after 10 minutes of kneading:

Form the dough into a ball and place it in a bowl. Cover with plastic wrap and let it rise at room temperature for about an hour, until doubled, or you can put it in the fridge for a long, slow, overnight rise (which is what I did).

Gently scrape the risen dough onto a well-floured surface, being careful not to deflate it. Cute the dough into 4 equal pieces and form each one into a ball by folding the edges in towards the middle and pinching to seal. Turn each ball over, seam side down, and let rest, covered, for 10 minutes.

To shape the baguettes, turn one ball of dough seam side up and gently flatten it into an oval shape with the heel of your hand (you don’t want to deflate it completely). Fold one long edge of the oval in to the middle and press to seal with the side of your thumb. Repeat with the remaining long edge of the oval, so that there is one seam running down the middle of the dough.

Now fold the dough in half along the seam you created and use your thumb or the heel of your hand against the counter top to seal the dough together, gently stretching the dough to elongate it as you go (this will minimize the amount of rolling you have to do to shape the baguettes). You can repeat the last fold one more time to make the baguette longer, if necessary. With both hands held flat, palms down, start in the middle and roll your hands towards the ends to elongate the baguette. Do this firmly but gently, exerting equal pressure with both hands. You want it about 16″ long, or long enough so that it will still fit on your baking stone (or baking sheet). Taper both ends of the baguette with the outside edge of your palms.

Place the baguettes seam side down on a well-floured cloth, making a pleat in the cloth between each baguette to prevent them from sticking together as they rise. Cover and rise for about an hour, until doubled.

Meanwhile, preheat your oven to 475˚F with a baking stone (if you have one) on a middle rack and a metal roasting pan placed on a lower rack.

Gently lift the proofed baguettes onto a piece of parchment paper (or a parchment-lined baking sheet). For regular baguettes, slash the top of the dough with a razor blade of sharp knife 4 or 5 times. The slashes should span the middle third of the baguette (lengthwise) and should only be slightly angled, with the start of each slash overlapping the end of the previous one. Susan at Wild Yeast illustrates this very well.

For epi baguettes, use scissors to make a steeply-angled cut, without cutting all the way through the bottom of the baguette. Fold the resulting segment of dough to one side. Repeat the cut, folding the next segment to the other side, until you have 4 or 5 “kernels” on your stalk of wheat.

For fougasse, skip the entire shaping process. Instead, once you’ve divided the risen dough into 4 pieces, flour each one, stretch it into a long triangle, and place on a parchment paper-lined baking sheet. With a dough scraper or any other straight edged-implement, make a cut down the middle of the triangle and gently pull the sides of the triangle to open it up. Because the dough is quite sticky, it’s best to make the cut in one single downward pressing motion rather than trying to saw or slice through the dough. Repeat 2 or 3 times with smaller cuts on both sides of the middle cut to make a leaf shape.

Using a pizza peel, transfer the bread and parchment paper to the baking stone in the preheated 475˚F oven. Pour about 1/2 a cup of hot tap water into the roasting pan for steam. Bake for 10 – 12 minutes, until well-browned and crusty. Let the bread cool completely (difficult, I know) before slicing.

This post submitted to YeastSpotting and Panissimo, created by Barbara and Sandra and hosted this month by Sandra.


Sugar & Spice Almond Danish Crescents

0
0

IMG_5432I’ve been holding out on you. I made these danishes back in full summer, but with their warm notes of spice and orange, they seemed too cozy and autumnal to share just then. But now, since yesterday was the Fall Equinox and Nate has already had to go up on the roof to clear off the maple leaves (that’s why it’s called “fall”, right?), it’s danish time!

Despite their crescent shape, these are danishes, not croissants. The difference (according to me, anyway) is that a croissant is a flaky, layered pastry with a soft, more bread-like interior, whereas a danish is made with more butter between the layers, making it crisper all the way through. These danishes also have swirls of spice and an almond-flavoured dough (plus browned butter), making them sort of like a cross between an almond danish and a cinnamon bun. Yeah, pretty yummy.

I assembled these late one evening to take to our friends’ house for breakfast the next morning. My brain was not functioning very well when I was rolling them up, and I forgot to sprinkle the dough with the spiced sugar mixture until after I’d already cut all the triangles, so you’ll have to use your imagination in the process pictures below because I did things the hard way (ie, sugaring each individual triangle… d’oh!) rather than the easier way that I describe in the recipe (ie, sugaring the entire rolled-out dough before cutting it). Either way though, these were really good and they disappeared quickly from the breakfast table!

“the hard way”


Sugar & Spice Almond Danish Crescents

Adapted from Seven Spoons. Makes 12 crescents.

Quick Danish Dough

In a large bowl, mix together with a whisk:

1 1/2 cup bread flour

3/4 cup whole wheat flour

2 1/4 tsp instant yeast

1 tsp kosher salt

1 tbsp sugar

With a pastry cutter, cut in 1 cup cold unsalted butter, diced, until in pea-sized bits.

In a small bowl, mix together:

1/4 cup warm water

1/2 cup milk, room temperature

1 egg, room temperature

1/2 tsp almond extract

Make a well in the flour mixture and pour the egg mixture in the middle. Stir together quickly (just until all the flour is incorporated) to combine into a shaggy, lumpy dough. Cover the bowl with plastic wrap and refrigerate overnight or up to 2 days.

Before proceeding, let the dough sit at room temperature for 10 – 15 minutes to take some of the chill off. Turn the dough out onto a floured surface and roll it out into a long rectangle, about 8″ x 14″, then fold it into thirds like a letter. Turn it 90˚so one of the short ends is facing you, roll out into a rectangle, and fold it into thirds again. Repeat 3 more times for a total of 5 folds, refrigerating as needed after folding if the butter starts to get too soft. Chill for about 30 minutes before assembling the crescents.

Filling

In a saucepan over medium high heat, melt 1/4 cup unsalted butter and cook it until it browns and smells nutty. Pour into a bowl and set aside until cool but still liquid.

In a bowl, mix together:

1/4 cup granulated white sugar

1/4 cup brown sugar

the grated zest of 1 orange

11/2 tsp ground cinnamon

1/2 tsp ground ginger

1/4 tsp ground cardamom

1/8 tsp grated nutmeg

a good pinch of kosher salt

Set aside.

Assembly

Roll the chilled dough out on a lightly floured surface into a 10″ x 20″ rectangle. Trim off the edges to make them perfectly straight, then (contrary to what is shown in the pictures) brush the dough with the browned butter and sprinkle it evenly with the spiced sugar, pressing the sugar gently to adhere it to the dough. Cut the dough into 6 rectangles, then cut each rectangle in half on the diagonal to make 12 triangles.

Pretend that the dough has been brushed with the browned butter and sprinkled with the spiced sugar mixture before being cut…

Working with one piece of dough at a time, gently stretch the triangle to make the long sides more equal. Cut a small notch in the center of the triangle’s base, then roll up the dough into a crescent, directing the first roll out towards each side to encourage a semi-circular shape. Place the crescents on a baking sheet lined with a silicon mat or parchment paper, cover with plastic wrap, and let proof at room temperature until almost doubled in size, about 45 minutes to 1 hour. OR, you can proof them slowly in the fridge overnight, then let them come to room temperature the next morning while the oven preheats (this is what I did).

Preheat the oven to 375˚F. Brush the proofed danishes with an egg was (1 egg mixed with 1 tbsp water) and sprinkle the tops with some sliced almonds.

Bake the danishes for about 20 minutes, until puffed and golden. Remove to a rack to cool slightly. Can be served warm or at room temperature.


Sourdough Kolaches

0
0

I’d never heard of a kolache until I saw a recipe posted on the Homesick Texan blog for strawberry cream cheese kolaches (written in response to the awful explosion in West, Texas) with an interesting back story of how this Czech pastry got so popular there. Apparently lots of Czech immigrants settled in the “Czech Belt” of central and south-central Texas, and now the kolache – a yeasted pastry usually with a fruit filling, sort of like a danish but without the laminated dough – has become widely available at bakeries, gas stations, and truck stops and is synonymous with road trips for many Texans. Like the doughnut and the cupcake, it is gaining popularity outside of Texas as well with unique, artisan interpretations both sweet and savoury.

Kolaches were chosen as this month’s Sourdough Surprises project, and despite their growing popularity, there were zero sourdough kolache recipes to be found. Now that the Sourdough Surprise bakers have tackled it, however, there will be dozens of sourdough varieties to choose from. I went searching for “the best” recipe I could find, and came up with Claudia Matcek’s State Grand Champion Poppy Seed Kolaches, winner of the 1987 Texas State and Burleson County Championship as well as the 1996 Burleson County Grand Championship. How’s that for best recipe? (Also: kolaches are a big enough deal in Texas that they have their own festivals and championship baking contests! How’s that for awesome?!)

I halved Claudia’s recipe, converted it to grams, converted it to sourdough, and took some inspiration from Simply Recipes’ kolaches by adding lemon and nutmeg to the dough. If you do a Google image search for kolaches, most of what you will see are rings of dough around a sweet filling, but a few of them are shaped as little square packages with the corners pinched into the middle. I made a half-batch of rings filled with candied orange-cream cheese and cinnamon-plum jam, and the other half-batch of squares with a traditional poppy seed filling. They are both really good, but I think I prefer the cream cheese/plum jam combo for the tartness of the jam. One important note about the filling is that if you are using jam, it should be quite firm – runny jam will just spill out during baking.

My kolaches came out a little bit denser than I imagine they should be, so don’t add too much flour and give them plenty of time to proof properly. The pastry itself doesn’t taste strongly of sourdough, but it has that mature, rich flavour that comes from a natural leaven. I took an entire weekend to make these kolaches – mixed the dough up on Saturday evening, let it rise/bulk ferment overnight, shaped it Sunday morning, and then left it to proof for a few more hours before baking. My kitchen is on the chilly side (especially in November) and I’m sure that you could make this process happen much faster if you had a warm spot to put the dough – but remember that when working with yeast (commercial or naturally-occurring), time equals flavour!

Thanks Robyn for suggesting kolaches as this month’s project – it’s always fun to learn about a new kind of food. :) Check out the link below for a gallery of sourdough kolaches made by the Sourdough Surprisers this month.

Sourdough Kolaches

Heavily adapted from Claudia Matcek’s State Grand Champion Poppy Seed Kolaches. Makes 12 pastries.

Dough

in a small pan, heat 215 grams milk until almost boiling. Remove from the heat and stir in:

60 grams butter

50 grams granulated white sugar

Set aside until cooled to lukewarm, then pour into the bowl of an electric mixer along with 125 grams mature sourdough starter.

Stir to dissolve the starter, then add:

330 grams all purpose flour

1 egg yolk

3 grams / 1/2 tsp salt

1/2 tsp vanilla extract

gated zest from 1/2 a lemon

1/4 tsp grated nutmeg

Mix with the dough hook on low speed to combine into a shaggy dough, then gradually add up to 65 grams all purpose flour to get a soft dough that cleans the sides of the bowl. You might not need all of the extra flour.

Knead on medium speed until the dough is smooth, soft and stretchy, but not overly sticky (about 10 minutes).

Place the dough in a buttered bowl, cover with plastic wrap, and let rise until doubled. This can take place overnight at a cool room temperature or in the fridge, or probably 2 – 3 hours in a warm place, depending on the strength of your starter.

Once the dough is risen, scrape it out of the bowl onto a lightly floured surface, flatten it down to re-distribute the yeasts, and divide it in half. Have about 1/3 cup melted butter at hand.

To make square kolache parcels, roll each half of the dough into a 12″ x 8″ rectangle. Cut into six 4″ squares. Place 1 tbsp of the filling of your choice (see below) in the middle, then bring the 4 corner of the square into the middle and pinch to seal. Brush with melted butter, cover with plastic wrap, and and let proof until the dough springs back slowly when poked (at least 1 hour in a warm place – this took closer to 3 hours in my cold kitchen!).

To make kolache rings, divide each half of the dough into 6 pieces. Roll each into a ball, then flatten each ball into a 3-inch round disc. Place on a lined baking pan, brush with melted butter, cover with plastic, and proof as above. When proofed, use your finger to make an indent in the middle of each disc, leaving a 1/2″ ring around the edge. Fill with 1 tbsp of the filling of your choice (see below).

To bake, preheat the oven to 350˚F. Bake the proofed, filled kolaches for about 25 – 35 minutes, until puffed and golden brown. Place on a rack to cool and brush with the remaining melted butter. Drizzle with glaze, if desired.

Glaze

In a bowl, mix together:

3/4 cups icing sugar

1 tbsp melted butter

1/4 tsp vanilla extract

Add 1 – 1 1/2 tbsp milk to make a runny icing with the desired consistency, then drizzle over the kolaches and let set for a few minutes.

Poppy Seed Filling

For better flavour, next time I’d replace the sugar with honey, adding it directly the milk instead of mixing it with the poppy seeds first. Makes enough to fill 12 kolaches.

In a small bowl mix together:

6 tbsp poppy seeds, ground in a food processor (I used a coffee grinder for this)

1 tsp all purpose flour

1 1/2 tbsp granulated white sugar

pinch salt

Bring 1/2 cup milk to a boil in a small saucepan then whisk in the poppy seed mixture and continue boiling until thick. Remove from the heat and add:

1/2 tsp vanilla

1/2 tsp unsalted butter

Let cool completely before using to fill the kolaches.

Cream Cheese and Jam Filling

Adapted from Homesick Texan. Makes enough to fill 12 kolaches.

In a medium bowl, cream together:

4 oz spreadable cream cheese, at room temperature

2 tbsp granulated white sugar

When the cream cheese is light and fluffy, add:

1 1/2 tbsp all purpose flour

1 egg yolk

1/4 tsp vanilla extract

optional: 1 tbsp candied orange peel or 1/2 tsp grated citrus zest

Mix together until well combined. To fill the kolaches, you will also need about 1/4 cup of firmly set jam. Place 1 heaped tsp of the cream cheese filling in the middle of each kolache and top with 1 heaped tsp of jam.

This post has been YeastSpotted  and submitted to Barbara and Sandra at Panissimo, hosted this month by Michela.


33% Whole Wheat Pain de Mie

0
0

I love baking bread with my sourdough starter, I really do. But sometimes, I want to bake bread on a whim. Sometimes, I want it to be a one day project – a one morning project, even – rather than a two to three day project. This is why I also love baking bread with commercial yeast, because when Nate asks for sandwich bread on Saturday evening, I can totally get it done on Sunday morning without having to do any planning or waiting for my sourdough starter to come out of hibernation.

Pain de mie is the French version of a sandwich loaf, commonly used to make the croque monsieur sandwich: a delicious combination of ham, melty cheese, and béchamel sauce on grilled bread. To die for. Traditionally, pain de mie is baked in a loaf pan with a lid so that it comes out perfectly square with a crunchy crust on all four sides, but I chose to bake it without a lid, and it is probably the most perfect-looking loaf of bread I’ve ever made! I think that comes down to the fact that I didn’t divide the dough into two loaves, and instead baked the whole thing in one 9″ x 5″ loaf pan, which gave it plenty of opportunity to rise up in a nice dome. I further broke from tradition by using one-third whole wheat flour, milled in my WonderMill grain mill. The bread is light and airy but it also has a nice wheaty flavour and a little bit of texture. A win all around, I’d say. I’m looking forward to sandwiches this week!

For the recipe, head over to the Grain Mill Wagon blog.

This post has been YeastSpotted and submitted to Barbara and Sandra‘s Panissimo bread showcase, hosted in December by Barbara of Bread & Companatico.

fresh bread with butter – nothing better!


Bread for a New Year

0
0

The Canadian Food Experience Project began June 7, 2013. As we share our collective stories through our regional food experiences, we hope to bring global clarity to our Canadian culinary identity. Visit Valerie’s blog, A Canadian Foodie, on the 15th for a round-up of this month’s posts.

This month on the Canadian Food Experience Project, Valerie has asked us to make a “Canadian Resolution”. I’m not a big resolution maker or goal setter (this article outlines my preferred method of forward momentum), but a little food-related one can’t hurt, right? So, my Canadian resolution for the year is to bake bread with Canadian grains, milled at home in my WonderMill grain mill when possible. This list of Canadian heritage wheat varieties is kind of astonishing – I had no idea there were that many varieties, and that’s only the wheat! I’m excited to see what’s out there, who’s growing what and where, and most of all, how it tastes. Bonus: one of the great local food discoveries I’ve made in the Cowichan Valley is True Grain Bread, a bakery that not only bakes gorgeous bread but also sells locally grown Vancouver Island wheat, both in grain form and as house-milled flour.

This goal is particularly timely being that Tartine‘s newest book has just come out, which focuses on whole grain bread. I don’t have the first Tartine bread book (which had a gigantic influence on home bakers and the artisan bread movement) but I am very excited anyway because Frances-Olive will be posting her journey through Tartine Book No. 3 on her gorgeous bread blog, Tartine Bread Experiment, and that means lots of bready inspiration.

And speaking of inspiration: this loaf is inspired by CakeWalk’s beautiful Ken Forkish-method loaf. Her recipe notes were a little sparse (or maybe I’m just bad with details) so I adapted a bit (aka, made it up), but it came out quite nicely – solid enough to give it some decorative slashes on top, airy holes within, and a chewy crust. It’s a sourdough loaf boosted with a tiny amount of instant yeast that just seems to give it that extra “oomph”. It employs the no-knead, long fermentation method with a few folds, and I was amazed at how the dough transformed from a messy, sticky bowl of gloop to a beautifully elastic dough in just four folds and a few hours rest. And although I’m not sure of its provenance, I did mill the whole wheat flour myself (and I bought it at local organic bulk food store, so at least I know it’s organic).

72% Hydration Whole Wheat Sourdough Boule

Ratios and basic method adapted from CakeWalk. Makes 1 loaf. This bread takes about 24 hours, start to finish, with most of that time being hands-off. The recipe is written according to the schedule I followed.

Day 1, morning: Mix Levain

In a large bowl, combine:

25 grams active starter (100% hydration)

100 grams water at 90˚F

100 grams all purpose flour

25 grams whole wheat flour

Mix well, cover, and let ferment for 6 – 8 hours. It might not rise much, but there should be some bubbly action happening on the bottom.

Day 1, early afternoon: Mix Dough

To the fermented levain, add:

100 grams whole wheat flour

300 grams all purpose flour

280 grams water at 90˚-95˚F

2 tsp kosher salt

1/4 tsp instant yeast

Mix together to thoroughly combine and form a rough dough. Scrape down the sides of the bowl and cover with plastic wrap.

Let the dough bulk ferment for 5 hours at room temperature, giving it a fold every 30 minutes for the first 2 hours (so 4 folds total).

Day 1, evening: Form Boule

Once the dough has fermented for 5 hours, turn it out onto a lightly floured surface and form it into a boule by pinching the edges of the dough into the center, then flipping it over and rotating it to form a tight ball of dough. The sticky seam of dough on the bottom will provide friction against your work surface to achieve this. Place the boule, seam-side up, on a well-floured couche or cotton tea towel and place it in a brotform or bowl to keep its shape. Place in a large plastic bag, close it up, and refrigerate overnight.

Day 2, morning: Bake Bread

Place a large, heavy Dutch oven in the oven, then turn it on to preheat to 475˚F. Once the oven reaches temperature, take the dough out of the fridge and turn it out onto a large piece of parchment paper so that it is seam-side down. Slash the top of the boule decoratively with a razor blade, then use the parchment paper to lower it into the preheated Dutch oven.

Bake with the lid on for 30 minutes, then remove the lid and bake for 10 – 25 minutes longer, until it is a nice deep brown. Remove from the oven and allow to cool completely before slicing (I know, it’s hard to wait!).

This post has been YeastSpotted and submitted to Barbara and Sandra‘s Panissimo, hosted on Sandra’s blog this month.


Montreal-Style Bagels

0
0

Montreal bagels in a basket

In the summer we started a little brunch tradition with friends, but in recent months have let it slide a bit. Now that another set of our friends have recently moved into the neighbourhood, January seemed the perfect opportunity to resurrect our brunch dates and put into action the homemade bagels I’ve have in my head ever since seeing this picture of a brunch starring the New York bagel. Only because I’m Canadian, my bagels would be of the Montreal variety, which, of course, meant looking up a million recipes in order to begin the agonizing process of picking the best one. I eventually came across a recipe on The Fresh Loaf posted by an alumnus of Vancouver Island University’s culinary arts program, who claimed that the formula was from the famed St Viateur Bagel bakery in Montreal, whose bagels are supposed to be the real deal.

brunch on the table

A Montreal-style bagel is distinguished by its small rustic handmade shape, large central hole, and dense, chewy texture. It is boiled in a honey-water bath before baking, and to be a “real” Montreal bagel, it should be made with Montreal water and baked in a wood fired oven. Most interestingly (to me, anyway), the dough contains no salt, and as a result, Montreal-style bagels are on the sweeter side. In comparison, a New York-style bagel contains salt, is generally much larger, and is baked in a conventional oven, giving it a lighter, puffier texture. Both bagels were brought to their respective cities/countries by Jewish immigrants from Poland, however Montreal-style bagels are the only variety so far to have made it into space!

Montreal style bagels in a basket

The best way to eat a bagel is fresh and hot out of the oven, so in order to serve bagels for brunch, I made the dough the night before, let it rise in the fridge overnight, and then shaped, boiled, and baked the bagels in the morning. It sounds like a lot to do before breakfast, but I only needed about an hour in the morning to accomplish it. It helps that the bagels do not need proofing, which contributes to their characteristic density. Because I have a terrible-horrible-no-good-very-bad electric oven and not a rustic wood-fired oven, my bagels did puff up more than they should have to be model Montreal bagels, but they tasted awesome: subtly sweet, hot and soft and just a little bit creamy inside with a slightly crisp, chewy crust. Topped with a smear of cream cheese, thinly sliced lox, capers, slivers of red onion, and appreciated by good friends, they were worth every bit of effort.

bagel with lox and cream cheese

Montreal-Style Bagels

Adapted from The Fresh Loaf, apparently St Viateur’s formula. Makes 13 bagels.

In a large bowl, combine:

1 kilo bread flour

2 grams instant yeast

40 grams granulated white sugar

9 grams malt powder

Stir together, then add:

1 large egg, beaten

2 1/2 tsp vegetable oil

463 grams water

Stir with a wooden spoon until it starts to clump together in a shaggy dough, then turn it out onto a unfloured surface and begin to knead. The dough will seem dry at first but it will come together in a stiff dough. Continue kneading for about 30 minutes, until it is smooth and elastic – it should spring back slightly when poked with a finger.

making bagel dough

At this point you have two choices: either cover the dough and let it rest on the counter for 45 minutes, OR put it in a bowl cover with plastic, and let it rise in the fridge overnight. If you let it rest for only 45 minutes, it won’t rise much, which is fine. If you choose the overnight option, it may double or triple in volume – just scrape the dough out of the bowl and deflate it before continuing.

bagel dough, risen and divided

When you are ready to prepare the bagels, preheat the oven to 460˚F with racks in the top and bottom third. Put a large pot of water on to boil and add 1 – 2 tbsp honey to the water.

Divide the dough into 13 portions, 113 grams / 4 oz each. To shape the bagels, roll each portion into a long snake, wrap it around your hand so the ends overlap on your palm, then roll the ends together to secure. Place on a baking sheet while you shape the remaining dough.

how to shape a bagel

As soon as all the bagels are shaped, drop them 2 – 3 at a time into the boiling water. As soon as they float, remove them and dip them in either sesame seeds or poppyseeds.

boiling bagels

Place the boiled bagels on two baking sheets sprinkled with cornmeal and bake in the top and bottom thirds of the preheated 460˚F oven for about 20 minutes, switching positions of the baking sheets halfway through, until the bagels are nicely golden brown. Serve the bagels immediately if possible, hot from the oven, or let them cool and split and toast them to serve.

baked bagels

This post has been YeastSpotted and submitted to Barbara and Sandra‘s Panissimo, hosted this month by Sandra.


Viewing all 71 articles
Browse latest View live


Latest Images