Image may be NSFW.
Clik here to view. Oh, hi. I’ve been kind of absent in these parts this week – I’m back at work full-time (did I mention I had four months off over the summer? Yeah, tough life!) and being out of the house for almost 10 hours a day while still trying to indulge in my blogging habit is taking some getting used to (I know, I know, suck it up Korena!). I just haven’t found the time or energy to finish a post, even though I have a backlog of recipes waiting to be posted. Oh well. First world problems, right?
Anyway, onto the topic of this post: the baguette. A seemingly simple cylinder of dough, tapered at both ends, baked to a shatteringly crisp, crusty perfection. However, having the inquiring mind that I do, I researched the heck out of just how to create said seemingly simple cylinder, and in the process, psyched myself out a bit (kind of like I did with macarons, another French creation). It wasn’t until I came across Richard Bertinet’s shaping instructions that I felt comfortable enough to try it out, and thankfully, it was actually much easier than I imagined.
Image may be NSFW.
Clik here to view.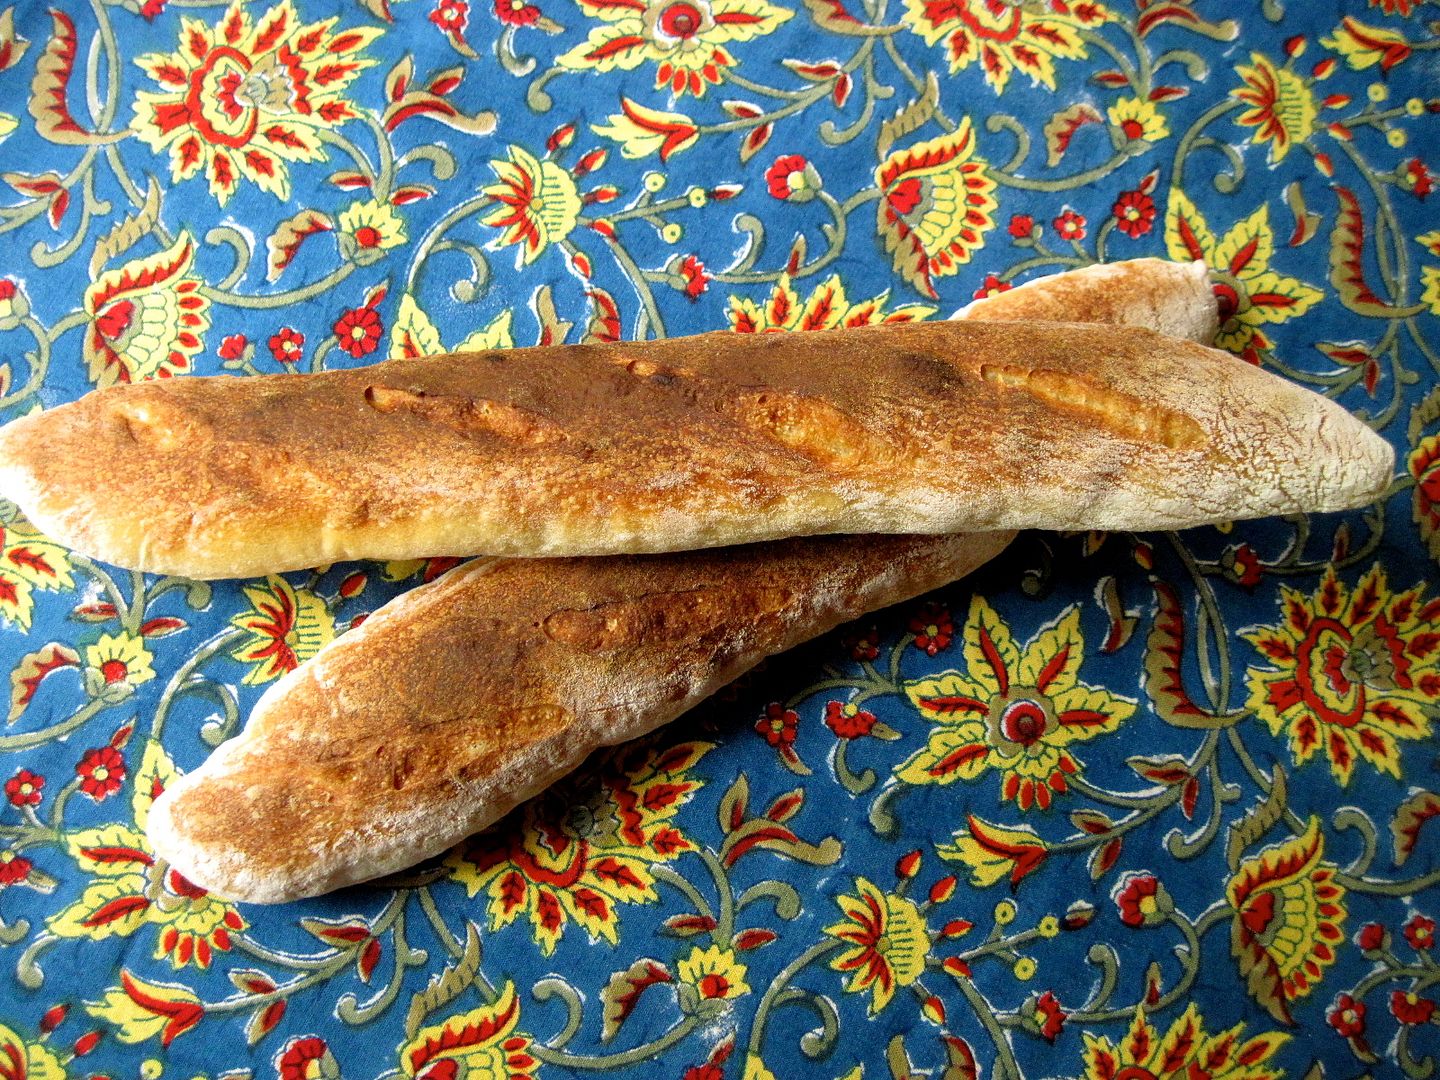
I made these with the white dough from Richard’s book, again using the slap-and-fold kneading technique (I made another video showing how the dough looks/behaves before and after kneading – see below!). The bread was nice, but my oven was having a terrible, horrible, no good, very bad day and did NOT want to hold a temperature above 375˚F, which is not conducive to that shatteringly crisp, crusty perfection I mentioned earlier. Instead, the crust ended up very pale on the bottom and kind of chewy overall, but I attribute this completely to equipment failure rather than to the recipe.
Clik here to view.

Brown on top, pale on the bottom. Silly oven, that’s not how it’s supposed to be!
Image may be NSFW.
Clik here to view.
That said, I think I do prefer the “no knead” recipes that employ a few folds to develop gluten and a longer rest time to develop flavour. I made another, much more successful attempt at baguettes using a modified version of my go-to everyday bread, and they turned out fantastically: the oven cooperated, the crust was shatteringly crisp, the slashes opened up nicely, and the taste was amazing. I’ll be making these again for sure, so stay tuned.
Clik here to view.

These ones came out perfectly though.
For this first attempt, I made a couple of the baguettes into epis, or stalks of wheat. This is a really easy technique – even easier than slashing a straight baguette – and looks pretty impressive. It’s perfect for serving at a dinner party (which is what I did) because the “kernels of wheat” can be broken off individually and no one has to worry about their dining companions wielding a bread knife in close quarters.
Image may be NSFW.
Clik here to view.
Oh yes, and remember I mentioned that I wanted to experiment with converting Richard’s recipe to sourdough? This was the result:
Image may be NSFW.
Clik here to view.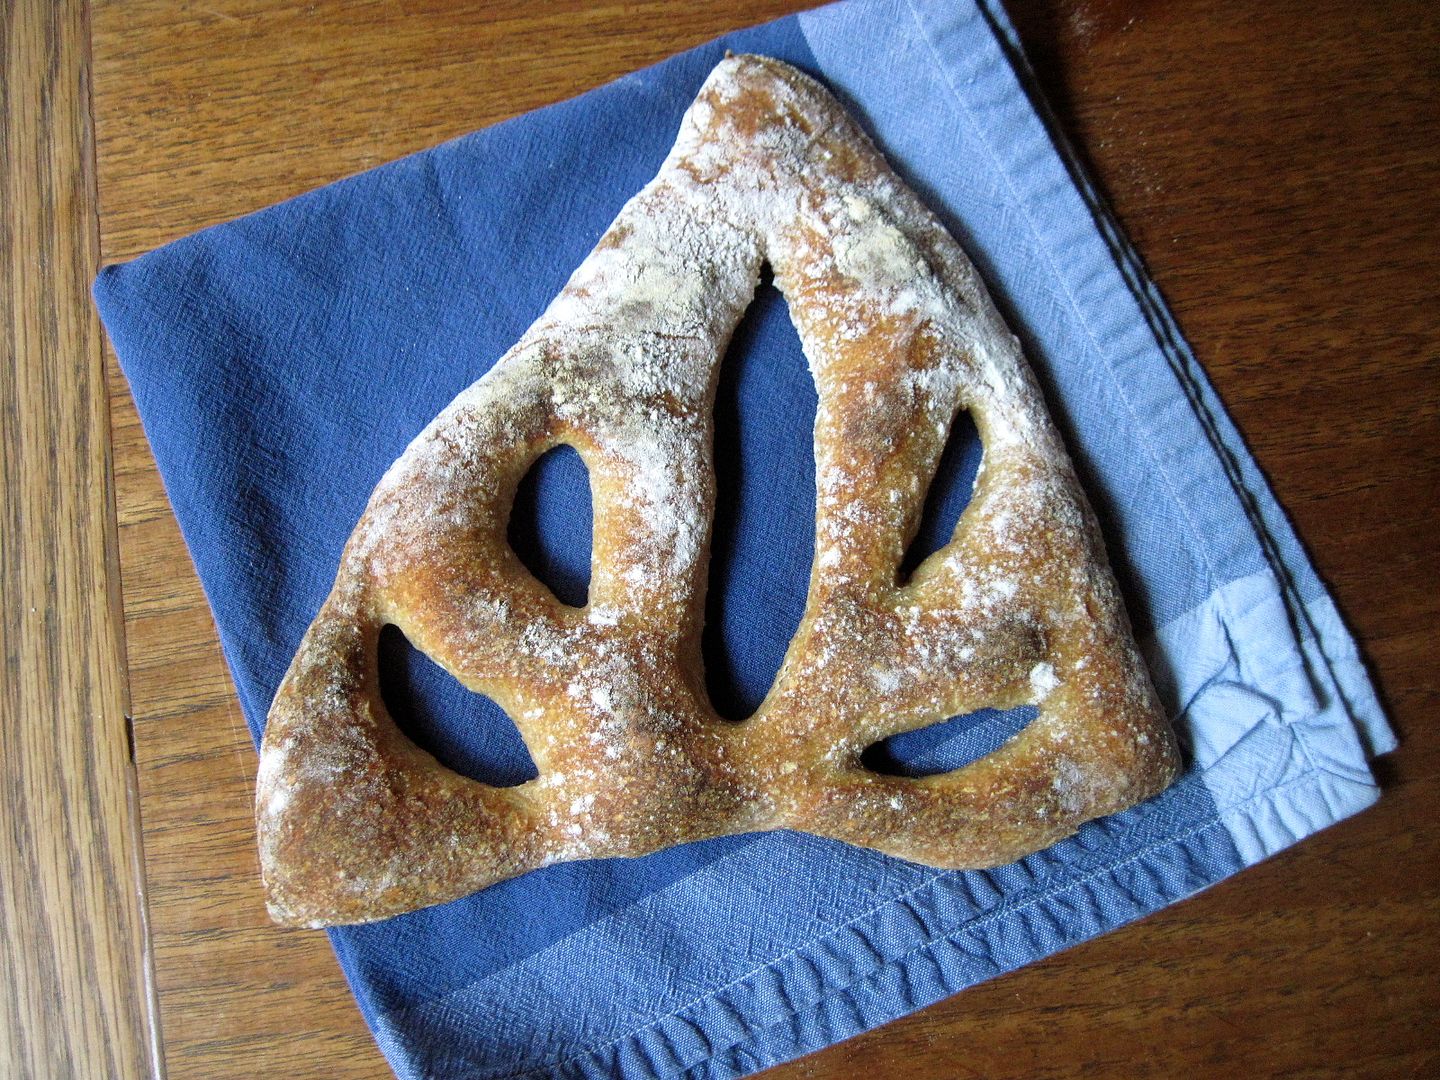
Looks pretty, but wasn’t very successful – another oven fail, combined with the fact that I got impatient (impatience and sourdough don’t mix, FYI) and didn’t give my starter enough chance to wake up from its hibernation in the fridge before baking with it, which meant that it didn’t rise very much at all, didn’t brown properly in the oven and instead got super hard and chewy, and tasted reeeeeeeeaaaaally sour. Unfortunately I gifted some of it to my neighbour before realizing this, but I’m hoping that the apricot oat bread that went along with it made up for it! Image may be NSFW.
Clik here to view.![]() This was another fun shape though: fougasse, which is slashed to create holes in the bread to suggest the shape of a leaf or stalk of wheat (again!). Moral of the story? Sometimes following a recipe is the right thing to do…
This was another fun shape though: fougasse, which is slashed to create holes in the bread to suggest the shape of a leaf or stalk of wheat (again!). Moral of the story? Sometimes following a recipe is the right thing to do…
White Baguettes
From Richard Bertinet’s Dough. Here is the video of Richard that comes with the book, showing how to mix and handle the dough. Makes 4 baguettes.
In a large bowl, mix together:
18 oz white bread flour
1 1/2 tsp active dry yeast
Stir in:
2 tsp fine grain salt
12 1/2 oz water (not fluid oz)
Mix until the dough comes together – you might need to add a few tablespoons more water to get all the flour moistened and incorporated.
Image may be NSFW.
Clik here to view.
Turn the dough out onto an unfloured surface and begin the slap-and-fold kneading technique, kneading until the dough is smooth, sticky but not sticking to everything, and very elastic. This video shows what it looks like at the start vs. the final product after 10 minutes of kneading:
Form the dough into a ball and place it in a bowl. Cover with plastic wrap and let it rise at room temperature for about an hour, until doubled, or you can put it in the fridge for a long, slow, overnight rise (which is what I did).
Image may be NSFW.
Clik here to view.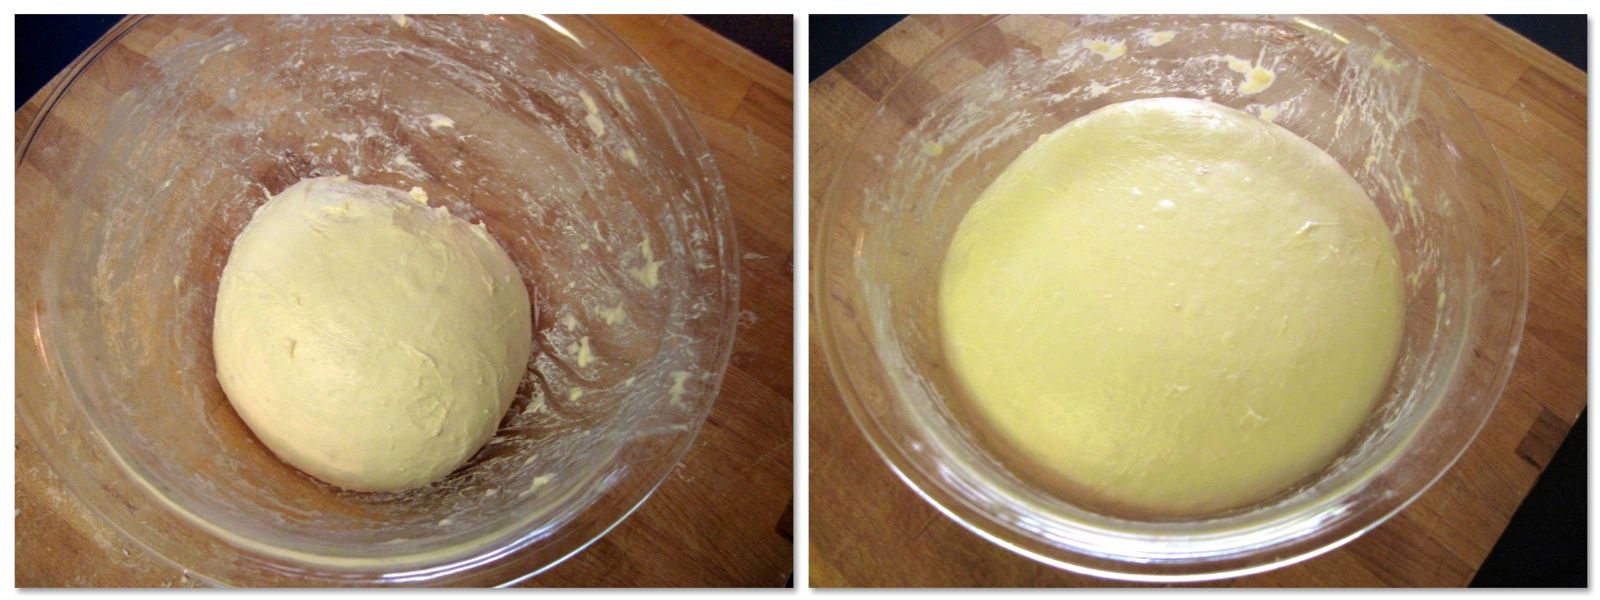
Gently scrape the risen dough onto a well-floured surface, being careful not to deflate it. Cute the dough into 4 equal pieces and form each one into a ball by folding the edges in towards the middle and pinching to seal. Turn each ball over, seam side down, and let rest, covered, for 10 minutes.
Image may be NSFW.
Clik here to view.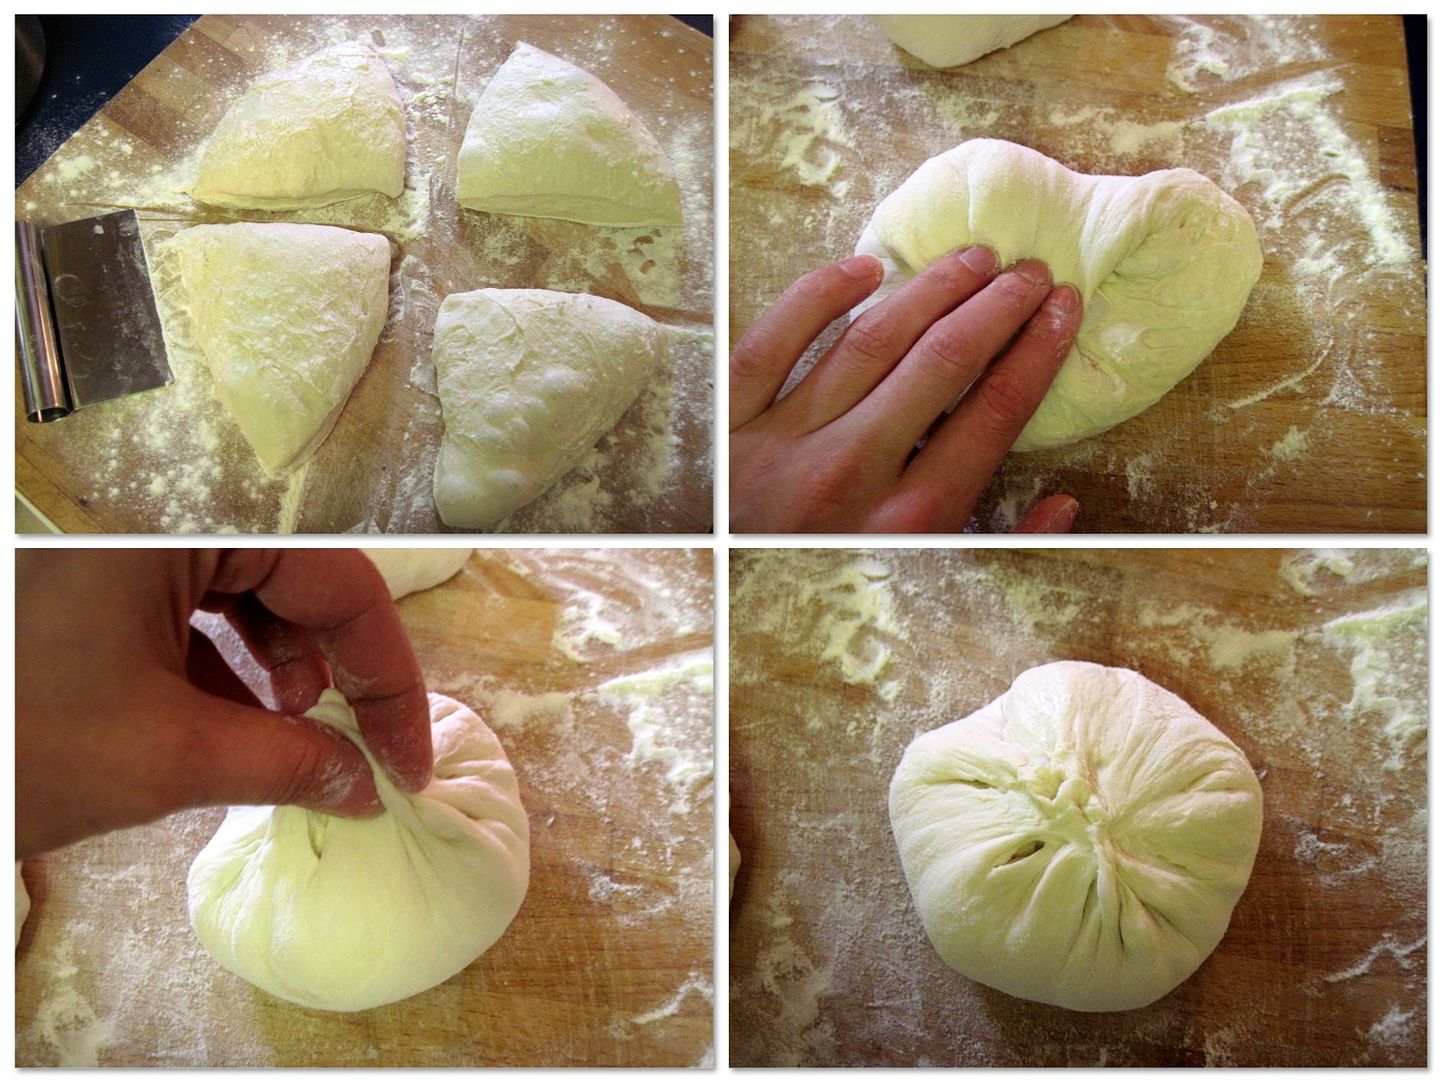
To shape the baguettes, turn one ball of dough seam side up and gently flatten it into an oval shape with the heel of your hand (you don’t want to deflate it completely). Fold one long edge of the oval in to the middle and press to seal with the side of your thumb. Repeat with the remaining long edge of the oval, so that there is one seam running down the middle of the dough.
Image may be NSFW.
Clik here to view.
Now fold the dough in half along the seam you created and use your thumb or the heel of your hand against the counter top to seal the dough together, gently stretching the dough to elongate it as you go (this will minimize the amount of rolling you have to do to shape the baguettes). You can repeat the last fold one more time to make the baguette longer, if necessary. With both hands held flat, palms down, start in the middle and roll your hands towards the ends to elongate the baguette. Do this firmly but gently, exerting equal pressure with both hands. You want it about 16″ long, or long enough so that it will still fit on your baking stone (or baking sheet). Taper both ends of the baguette with the outside edge of your palms.
Image may be NSFW.
Clik here to view.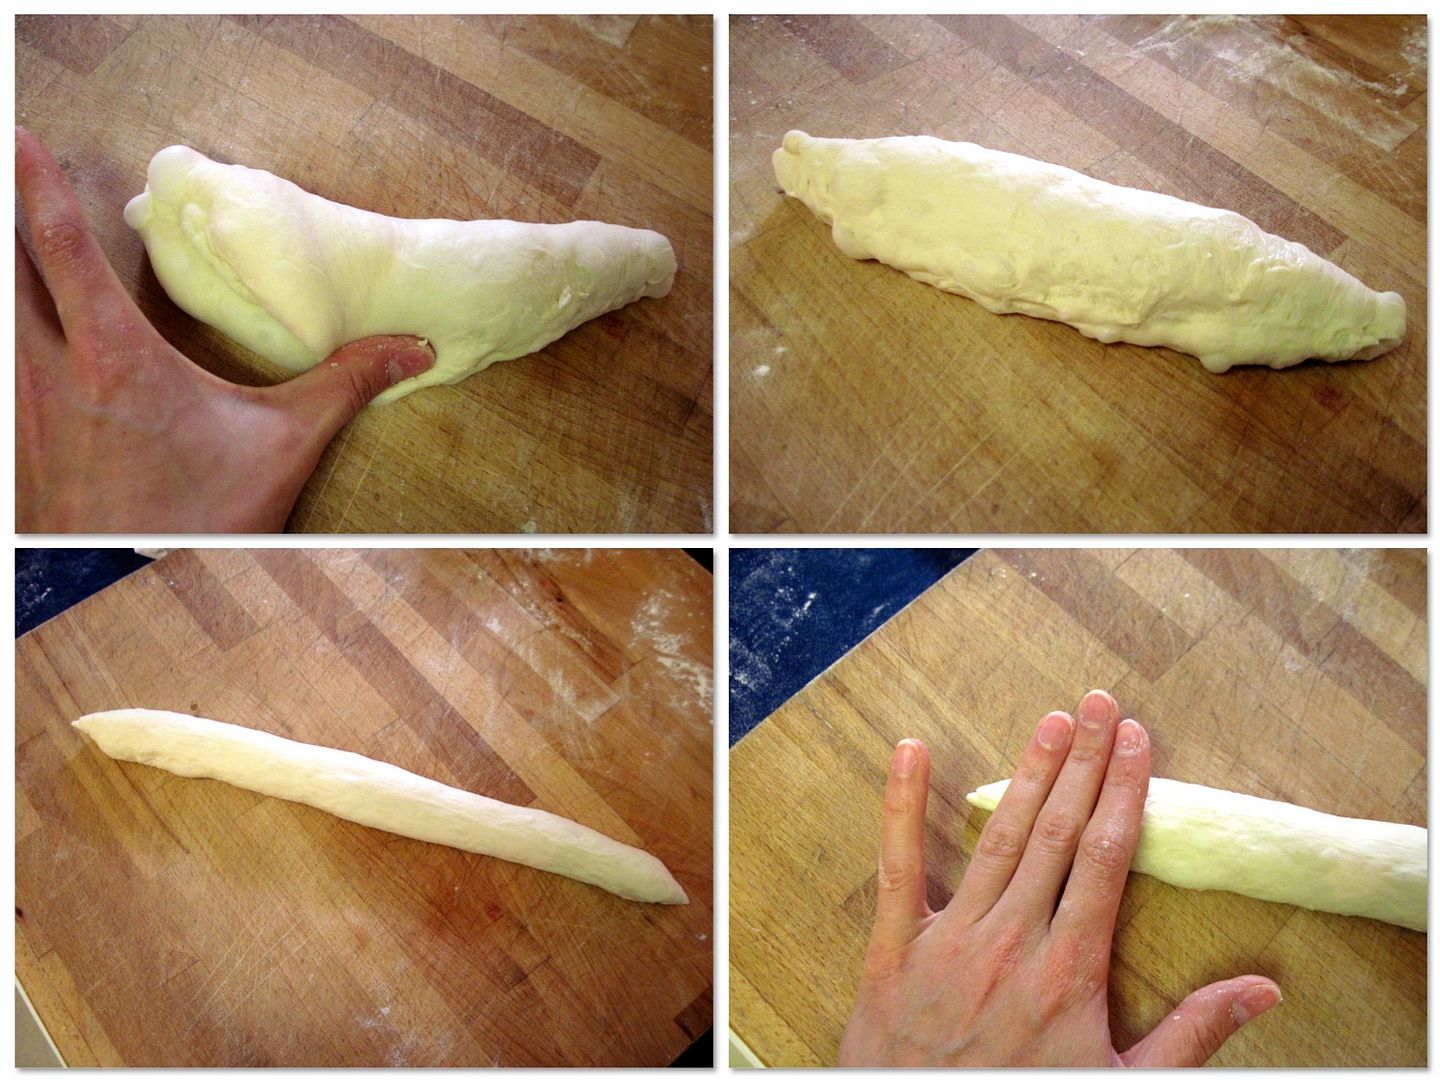
Place the baguettes seam side down on a well-floured cloth, making a pleat in the cloth between each baguette to prevent them from sticking together as they rise. Cover and rise for about an hour, until doubled.
Image may be NSFW.
Clik here to view.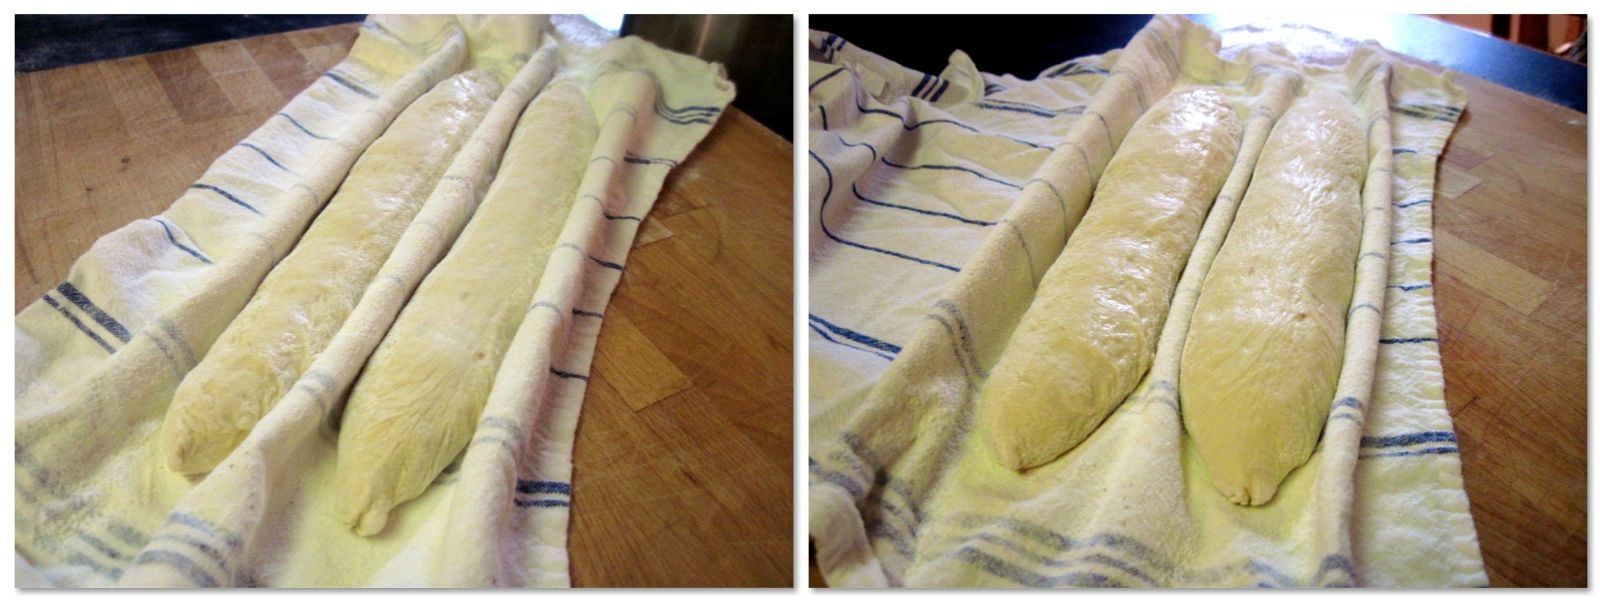
Meanwhile, preheat your oven to 475˚F with a baking stone (if you have one) on a middle rack and a metal roasting pan placed on a lower rack.
Gently lift the proofed baguettes onto a piece of parchment paper (or a parchment-lined baking sheet). For regular baguettes, slash the top of the dough with a razor blade of sharp knife 4 or 5 times. The slashes should span the middle third of the baguette (lengthwise) and should only be slightly angled, with the start of each slash overlapping the end of the previous one. Susan at Wild Yeast illustrates this very well.
Image may be NSFW.
Clik here to view.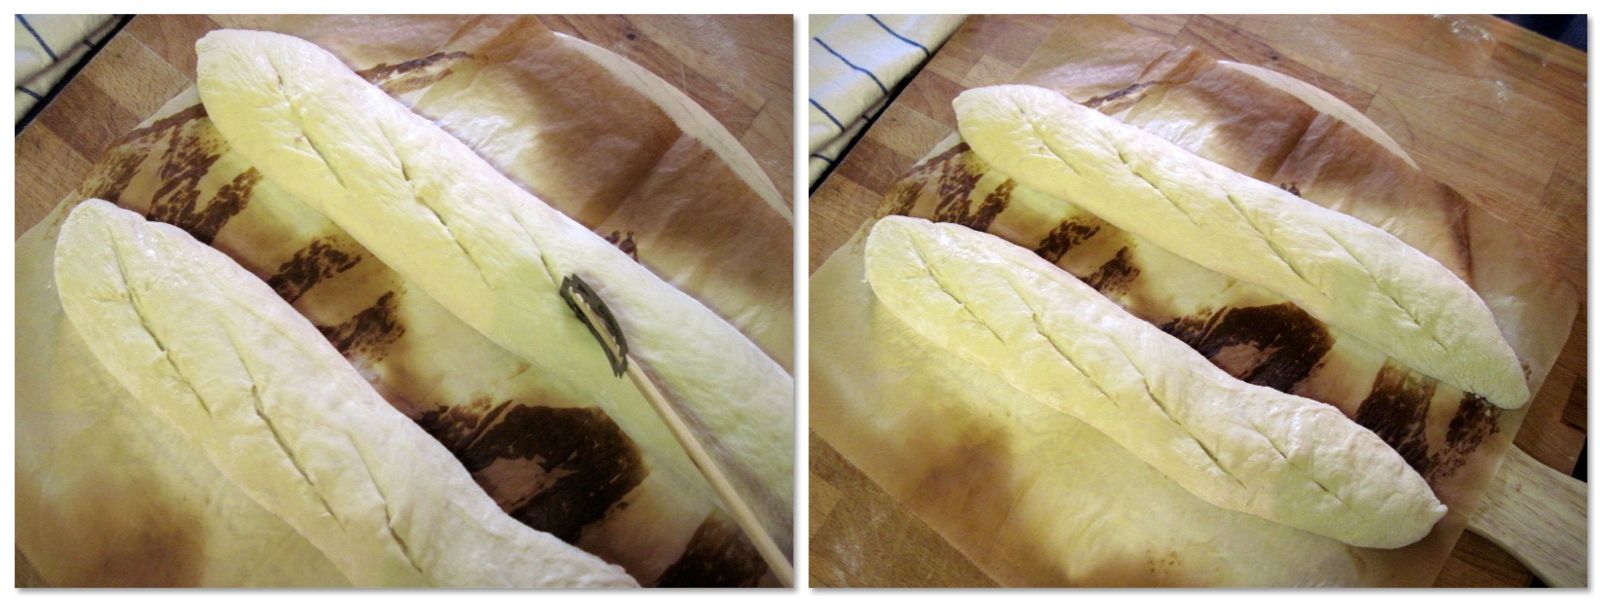
For epi baguettes, use scissors to make a steeply-angled cut, without cutting all the way through the bottom of the baguette. Fold the resulting segment of dough to one side. Repeat the cut, folding the next segment to the other side, until you have 4 or 5 “kernels” on your stalk of wheat.
Image may be NSFW.
Clik here to view.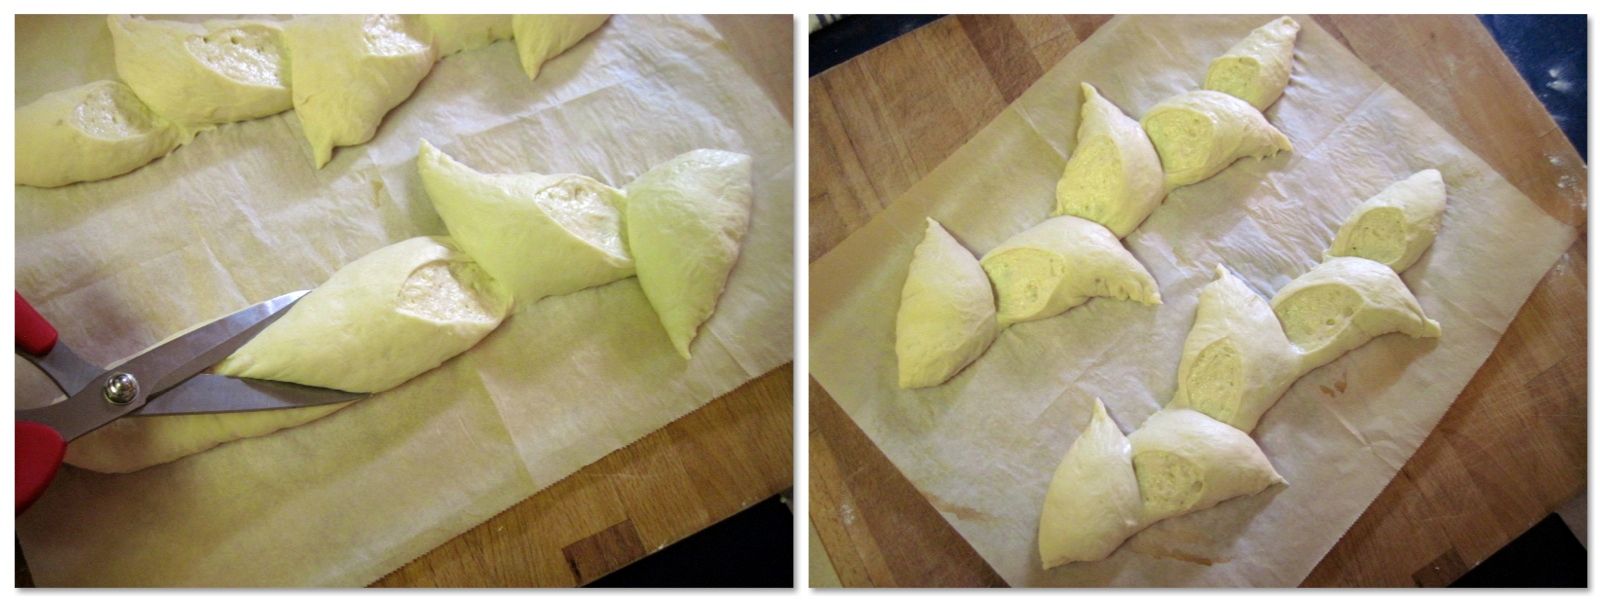
For fougasse, skip the entire shaping process. Instead, once you’ve divided the risen dough into 4 pieces, flour each one, stretch it into a long triangle, and place on a parchment paper-lined baking sheet. With a dough scraper or any other straight edged-implement, make a cut down the middle of the triangle and gently pull the sides of the triangle to open it up. Because the dough is quite sticky, it’s best to make the cut in one single downward pressing motion rather than trying to saw or slice through the dough. Repeat 2 or 3 times with smaller cuts on both sides of the middle cut to make a leaf shape.
Image may be NSFW.
Clik here to view.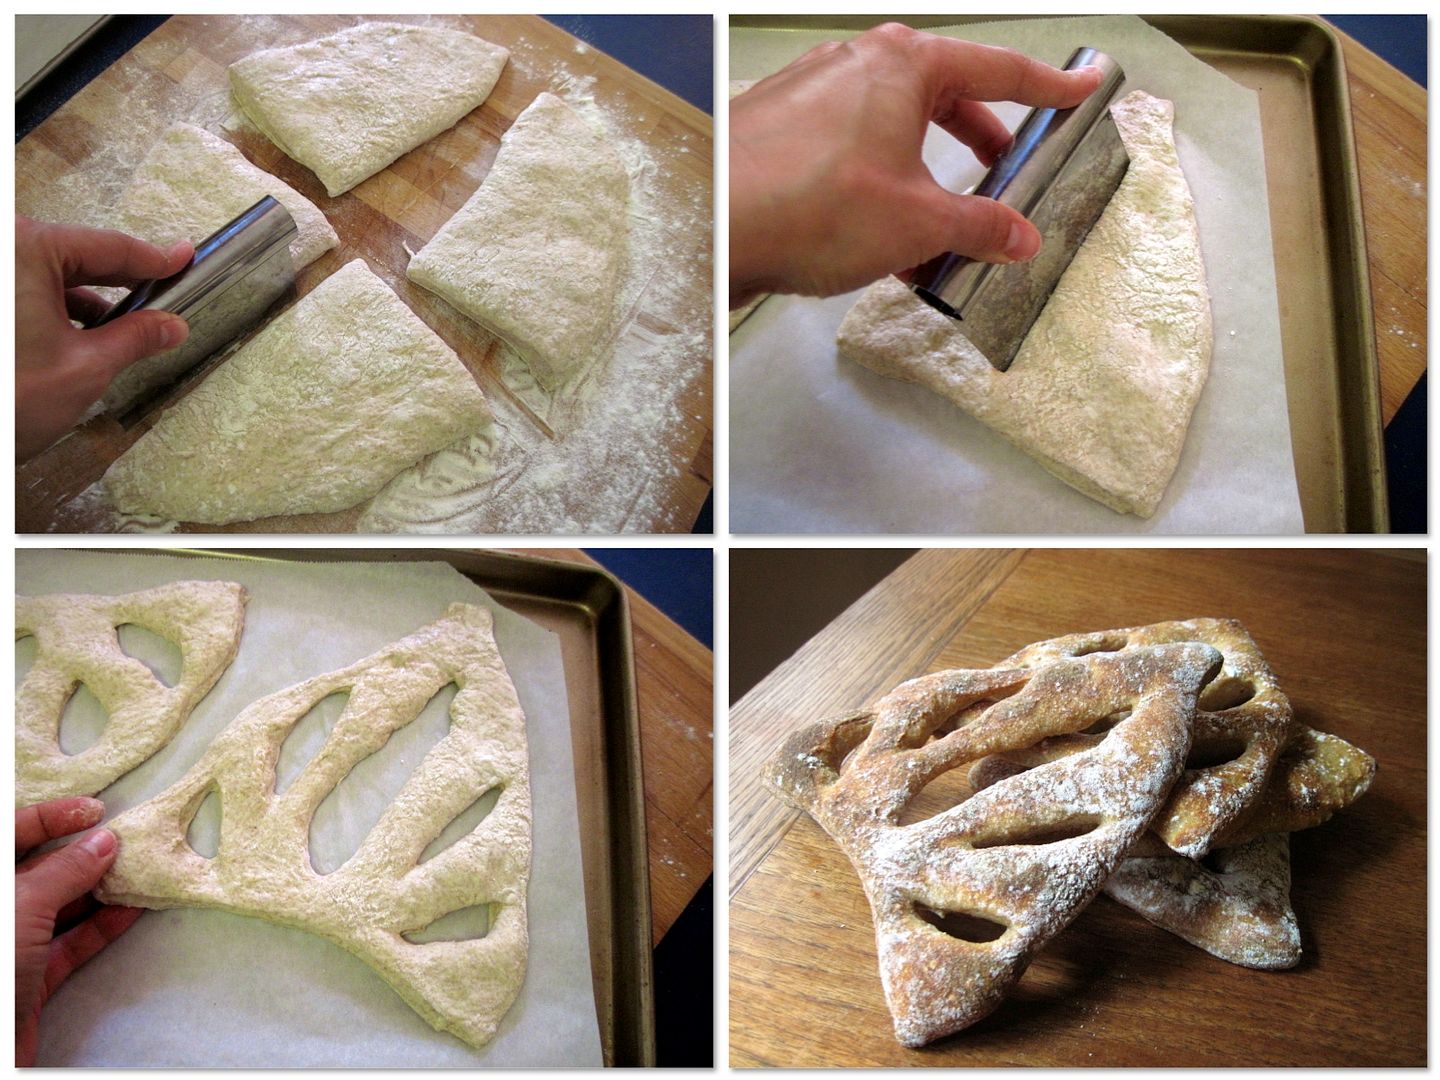
Using a pizza peel, transfer the bread and parchment paper to the baking stone in the preheated 475˚F oven. Pour about 1/2 a cup of hot tap water into the roasting pan for steam. Bake for 10 – 12 minutes, until well-browned and crusty. Let the bread cool completely (difficult, I know) before slicing.
Image may be NSFW.
Clik here to view.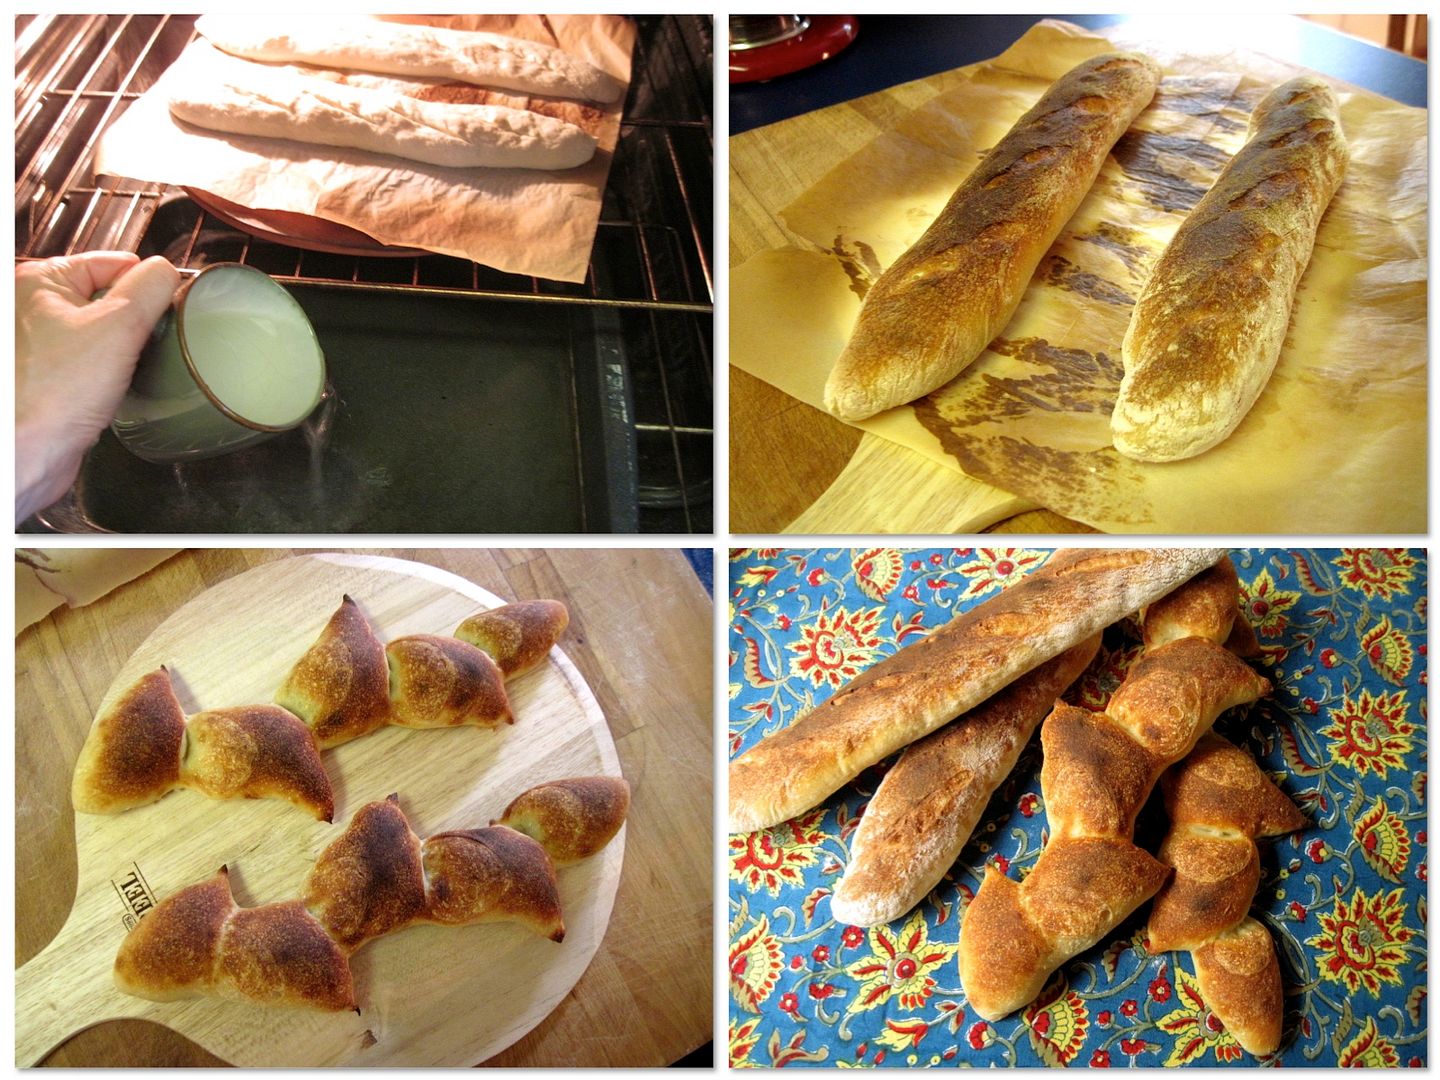
This post submitted to YeastSpotting and Panissimo, created by Barbara and Sandra and hosted this month by Sandra.
Image may be NSFW.
Clik here to view.
Clik here to view.
